

BEWARE OF WORDS!!! If you want to skip straight to the pictures, you can probably gather most of the story in kindergarten picture book style.
Preface:
After reading so many good things about the Big Green Egg on this forum and others, I had finally decided to pony up the cash and give it a whirl.
I really liked the idea of a grill table, but I didn’t want to spend upwards of $500 and I didn’t want to settle for the small version that BGE puts out. In order to prove to myself that I was really willing to make the commitment for the BGE, I wanted to put forth the time and effort in constructing my own table.
Borrowing ideas from other tables that I have found online, I drew up a list of my ideas, then a construction drawing, then a bill of materials and finally went shopping.
NOTE: It should be known that I am an electrical engineer and NOT a professional woodworker, this is the first time that I have ever tried to create a furniture quality piece and only the second time that I have ever attempted to construct anything with 4 legs and a level surface (the other being the work bench used in the pictures below).
The Story:
I had originally wanted to construct the table from a nice hardwood like oak, but quickly found that the raw material was much much more expensive. I settled on untreated pine that I could later stain and finish. The knot free furniture grade pine was about 2-3x more expensive than the bulk, so I decided to make the top deck of my table from the expensive stuff while I would make the frame and the bottom deck from the cheaper variety. (Note: I spent a good amount of time sifting through the bulk wood to find pieces which were straight, bark free and contained fewer/prettier knots)
I started the project on a Monday after work and completed it 2 Fridays later. I spent almost every night and weekend working on it though.
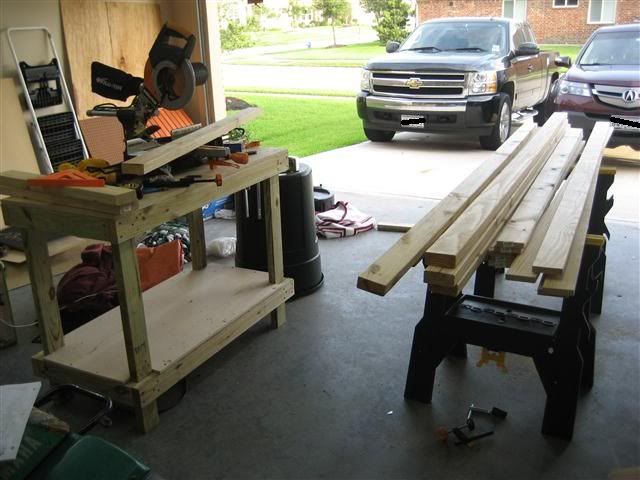
Picture 1:
(6/8/2010) - I have all of my lumber in my garage lying across a pair of saw horses prepared to get cut. I used a tape measure and a triangle to mark all of my cuts and a 10” miter saw to do the deed.
Picture 2:
I had finished cutting the wood for the frame.

Picture 3:
By the end of the first night, I had assembled one half of the table’s frame.

Picture 4:
(6/9/2010) – I completed the second half of the frame and attached the piece I had completed the previous night.

Picture 5:
In an attempt to keep as many screw holes as possible invisible from the outside, I made a cut out of the support beams so that I could screw the deck screws from the inside

Picture 6:
(6/11/2010) – I bought some wood filler from Home Depot to fill in the dimple created by the deck screws. It looked sloppy at first, but I needed to let it harden before I could sand it.

Picture 7:
Here is the same corner after sanding. Much better. :-)

Picture 8 & 9:
Here is the frame before and after its first stain.


Picture 10, 11 & 12:
Here are the cut 1x4s for the bottom deck before sanding and staining and then after staining.


Picture 13:
This is the side bottom deck slat that is being cut to fit.

Picture 14:
(6/12/2010) – Here are the top slats cut and stained. All of the wood received about 3 or 4 coats of stain before I was done.

Picture 15:
Here are the slats installed on the frame. I made a couple ¼” spacers to quickly measure out and hold the slat gap and a ½” spacer to quickly measure out the slat hang over.
After swapping between my drill bit and my Philips head about 20 times, I decided to get out a backup driver so that I could use one for drilling and one for…uh…screwing.

Picture 16 & 17:
The table after the hole is cut. I drew the circle by drilling a screw partially through the center of where I wanted my circle and then rotating a pencil attached to a length of twine equal to the radius of the circle around the screw. The hole was cut with a jigsaw.


Picture 18:
(6/13/2010) - I used standard wood laquer for the frame, bottom deck and underside of both decks. I used a 2 part epoxy ‘bar lacquer for the top deck. It was my first time to work with the stuff and it can be quite tricky, especially when dealing with a deck made of slats. I do like how it turned out for the most part. It looks like about 50 coats of regular lacquer.
The bottom deck and frame received about 2 or 3 coats of lacquer.

Picture 19:
Here is a close up of the stuff I used for the table top. It is pretty spendy (about $20 for that particular kit), but the results are hard to beat.

Picture 20:
(6/14/2010) – Here is the 2 gang electrical box that will contain a switch for the grill light and 2 outlets.

Picture 21:
Here is the junction box mounted directly behind the 2 gang box.

Picture 22:
(6/15/2010) – I wanted the grill light between the table top portion and the BGE, so I needed to use romex to route the power around the frame.

Picture 23 & 24:
After buying some 4” / 250lb casters, I needed to trim the legs of the table so that the table top would be at a comfortable level. I used a circular saw to make the cuts. The pictures show the legs before and after the cuts.


Picture 25, 26 & 27:
I used a trim piece of 2x4 to widen the bottom of the legs to allow for the large bracket size of the casters.


Picture 28:
Pièce de résistance! The A&M bottle opener that I ordered online. I open its first beer soon after.

Picture 29, 30 & 31:
(6/18/2010) - I finally bought and mounted the BGE! I did have to hire a crane to lower into position, but it was worth it. ;-) As you can see, I have also finished adding the grill light, tool hook and blank metal plate to the front of the table.


Note: If you noticed a few skipped days in the photos, there were a few nights that consisted of applying stain or lacquer and then waiting for it to cure before a rinse and repeat.
I didn’t keep a really close eye on the material cost of the project because I was buying some tools and other house stuff at the same time, but I jotted everything down and came up with a total cost of $250-275 for all raw materials including hardware and finishes.
Soon after the last picture was taken, I fired up the grill for a dry run burn. It quickly fired up to 700 degrees before I throttled it back to 250 and let it run for a couple hours. I still don’t have much experience with it, but I am impressed with its construction and ease of use.
I already have plans for a phase 2 of the project where I plan on adding a foldable side table on the grill side for extra table top real estate when the situation calls for it.
I had fun and learned a lot during this project, but I am glad that I don’t have to spend anymore sweaty evenings in the garage.
I’ll try to post more picture updates after some live fire bbq trials.
If only I could get a Doss sticker to top it off…
Gig ‘Em
PS. If I left out some details that you want to know, just let me know what else I can add to the writeup. If you have ideas I can use for improvements, I’m open for future upgrades.
Too Long Didn’t Read; Guy finds a way to get fatter.
[This message has been edited by chilidogfood (edited 6/18/2010 10:56p).]
Preface:
After reading so many good things about the Big Green Egg on this forum and others, I had finally decided to pony up the cash and give it a whirl.
I really liked the idea of a grill table, but I didn’t want to spend upwards of $500 and I didn’t want to settle for the small version that BGE puts out. In order to prove to myself that I was really willing to make the commitment for the BGE, I wanted to put forth the time and effort in constructing my own table.
Borrowing ideas from other tables that I have found online, I drew up a list of my ideas, then a construction drawing, then a bill of materials and finally went shopping.
NOTE: It should be known that I am an electrical engineer and NOT a professional woodworker, this is the first time that I have ever tried to create a furniture quality piece and only the second time that I have ever attempted to construct anything with 4 legs and a level surface (the other being the work bench used in the pictures below).
The Story:
I had originally wanted to construct the table from a nice hardwood like oak, but quickly found that the raw material was much much more expensive. I settled on untreated pine that I could later stain and finish. The knot free furniture grade pine was about 2-3x more expensive than the bulk, so I decided to make the top deck of my table from the expensive stuff while I would make the frame and the bottom deck from the cheaper variety. (Note: I spent a good amount of time sifting through the bulk wood to find pieces which were straight, bark free and contained fewer/prettier knots)
I started the project on a Monday after work and completed it 2 Fridays later. I spent almost every night and weekend working on it though.
Picture 1:
(6/8/2010) - I have all of my lumber in my garage lying across a pair of saw horses prepared to get cut. I used a tape measure and a triangle to mark all of my cuts and a 10” miter saw to do the deed.
Picture 2:
I had finished cutting the wood for the frame.
Picture 3:
By the end of the first night, I had assembled one half of the table’s frame.
Picture 4:
(6/9/2010) – I completed the second half of the frame and attached the piece I had completed the previous night.
Picture 5:
In an attempt to keep as many screw holes as possible invisible from the outside, I made a cut out of the support beams so that I could screw the deck screws from the inside
Picture 6:
(6/11/2010) – I bought some wood filler from Home Depot to fill in the dimple created by the deck screws. It looked sloppy at first, but I needed to let it harden before I could sand it.
Picture 7:
Here is the same corner after sanding. Much better. :-)
Picture 8 & 9:
Here is the frame before and after its first stain.
Picture 10, 11 & 12:
Here are the cut 1x4s for the bottom deck before sanding and staining and then after staining.
Picture 13:
This is the side bottom deck slat that is being cut to fit.
Picture 14:
(6/12/2010) – Here are the top slats cut and stained. All of the wood received about 3 or 4 coats of stain before I was done.
Picture 15:
Here are the slats installed on the frame. I made a couple ¼” spacers to quickly measure out and hold the slat gap and a ½” spacer to quickly measure out the slat hang over.
After swapping between my drill bit and my Philips head about 20 times, I decided to get out a backup driver so that I could use one for drilling and one for…uh…screwing.
Picture 16 & 17:
The table after the hole is cut. I drew the circle by drilling a screw partially through the center of where I wanted my circle and then rotating a pencil attached to a length of twine equal to the radius of the circle around the screw. The hole was cut with a jigsaw.
Picture 18:
(6/13/2010) - I used standard wood laquer for the frame, bottom deck and underside of both decks. I used a 2 part epoxy ‘bar lacquer for the top deck. It was my first time to work with the stuff and it can be quite tricky, especially when dealing with a deck made of slats. I do like how it turned out for the most part. It looks like about 50 coats of regular lacquer.
The bottom deck and frame received about 2 or 3 coats of lacquer.
Picture 19:
Here is a close up of the stuff I used for the table top. It is pretty spendy (about $20 for that particular kit), but the results are hard to beat.
Picture 20:
(6/14/2010) – Here is the 2 gang electrical box that will contain a switch for the grill light and 2 outlets.
Picture 21:
Here is the junction box mounted directly behind the 2 gang box.
Picture 22:
(6/15/2010) – I wanted the grill light between the table top portion and the BGE, so I needed to use romex to route the power around the frame.
Picture 23 & 24:
After buying some 4” / 250lb casters, I needed to trim the legs of the table so that the table top would be at a comfortable level. I used a circular saw to make the cuts. The pictures show the legs before and after the cuts.
Picture 25, 26 & 27:
I used a trim piece of 2x4 to widen the bottom of the legs to allow for the large bracket size of the casters.
Picture 28:
Pièce de résistance! The A&M bottle opener that I ordered online. I open its first beer soon after.
Picture 29, 30 & 31:
(6/18/2010) - I finally bought and mounted the BGE! I did have to hire a crane to lower into position, but it was worth it. ;-) As you can see, I have also finished adding the grill light, tool hook and blank metal plate to the front of the table.
Note: If you noticed a few skipped days in the photos, there were a few nights that consisted of applying stain or lacquer and then waiting for it to cure before a rinse and repeat.
I didn’t keep a really close eye on the material cost of the project because I was buying some tools and other house stuff at the same time, but I jotted everything down and came up with a total cost of $250-275 for all raw materials including hardware and finishes.
Soon after the last picture was taken, I fired up the grill for a dry run burn. It quickly fired up to 700 degrees before I throttled it back to 250 and let it run for a couple hours. I still don’t have much experience with it, but I am impressed with its construction and ease of use.
I already have plans for a phase 2 of the project where I plan on adding a foldable side table on the grill side for extra table top real estate when the situation calls for it.
I had fun and learned a lot during this project, but I am glad that I don’t have to spend anymore sweaty evenings in the garage.
I’ll try to post more picture updates after some live fire bbq trials.
If only I could get a Doss sticker to top it off…
Gig ‘Em
PS. If I left out some details that you want to know, just let me know what else I can add to the writeup. If you have ideas I can use for improvements, I’m open for future upgrades.
Too Long Didn’t Read; Guy finds a way to get fatter.
[This message has been edited by chilidogfood (edited 6/18/2010 10:56p).]
