
Seen quite a few shower question threads... Thought I'd post my experience. Maybe others will find this helpful.
Ok... Some of y'all might recall me being on here several months ago asking some questions about tile and waterproofing a shower. I was prepping to repaint the master bathroom. The master bathroom and bedroom were the last two rooms to need repainting after one project led to another and before I knew it I was repainting the entire house as well as updating most of the hardware and fixtures! Quick job to recaulk the tub and lo and behold, there was the water damage.
What started as a couple of tile popping off of the outer edge of the tub, revealed this...
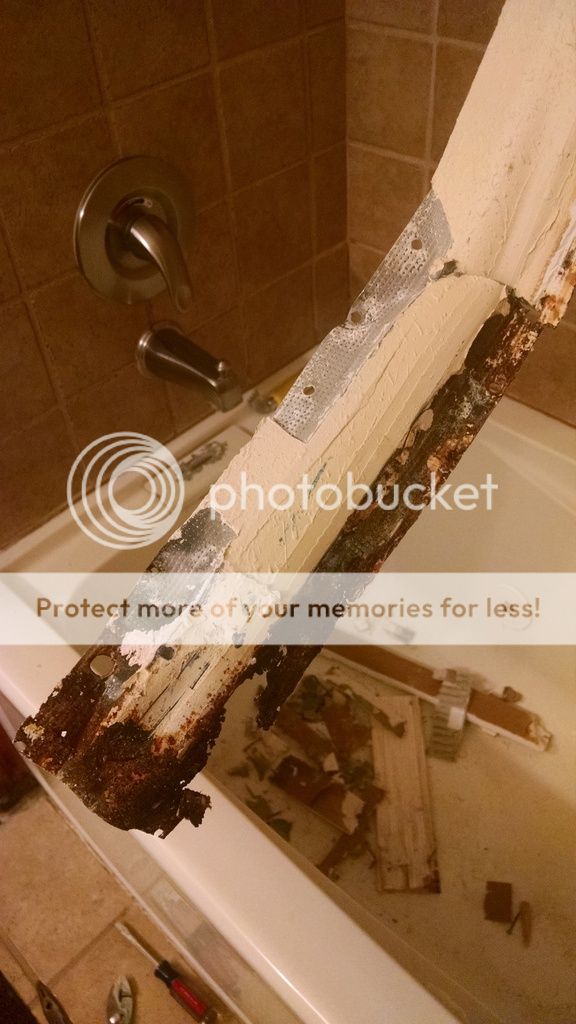
That obviously doesn't look good, but hey it's just a couple of feet of sheetrock thats only a few inches wide. No big deal. Let me just remove one of the 6x6 tiles to give me more room to work. Wait... Oh no. Thanks to some advise from here, you'll see there's no moisture barrier installed by the builder.
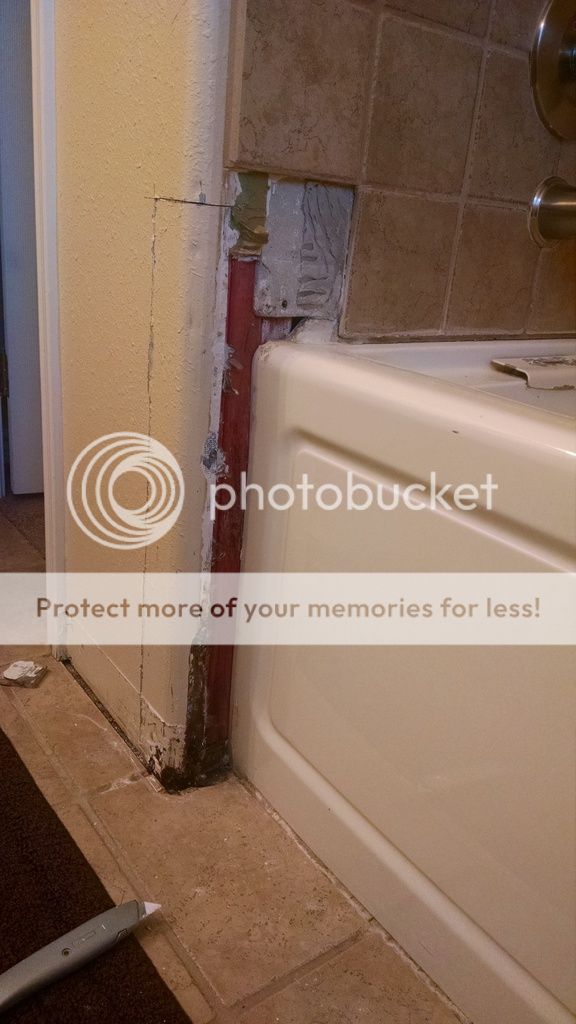
After much deliberation... Out it will come... Out it must come. I'll do the job right, and I might was well turn it into a walk in shower.
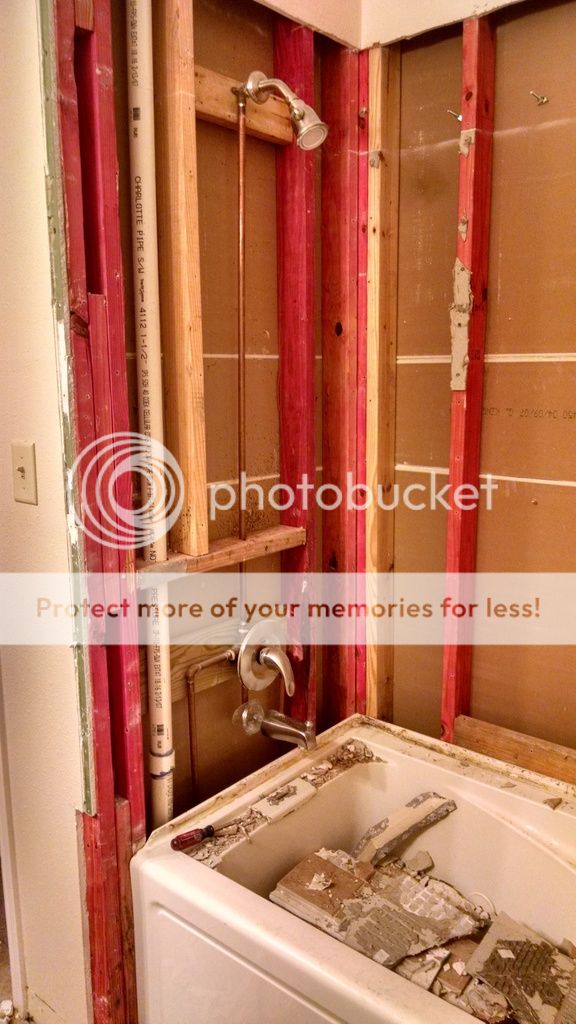

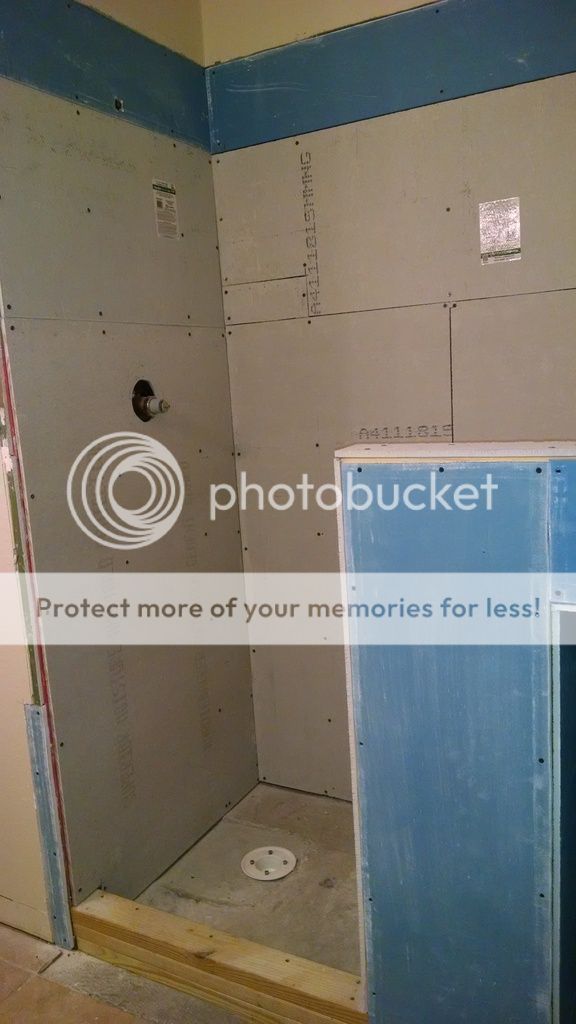
Finally getting it all stripped out. With the help from a friend we got the tub out and hauled off the mortar base. Extra sheetrock was removed all around to give me more room to work, as well as a stud to splice back onto.

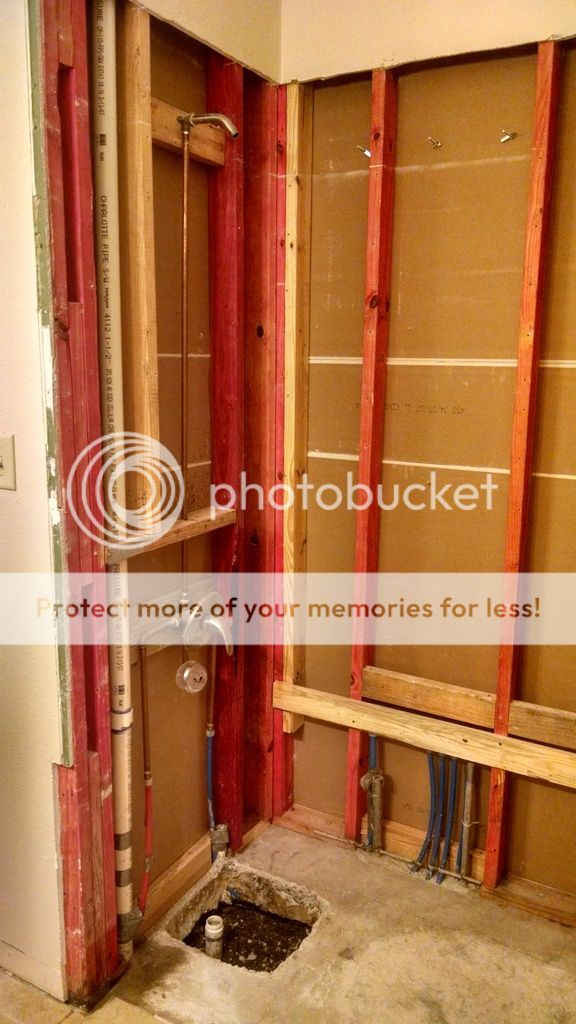
You'll notice I've also removed one strip of narrow field tile. I'm widening the shower a few inches since it's going to be a fully custom job. This will eliminate the 3" inset in the tub nook. I've also got the drain dug out in prep to move it a few inches away from the wall.
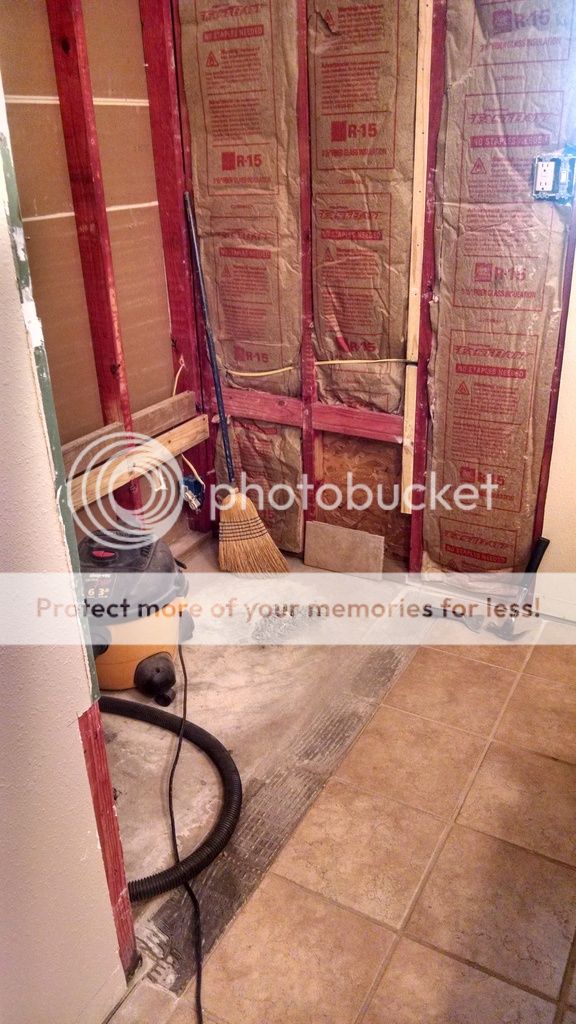
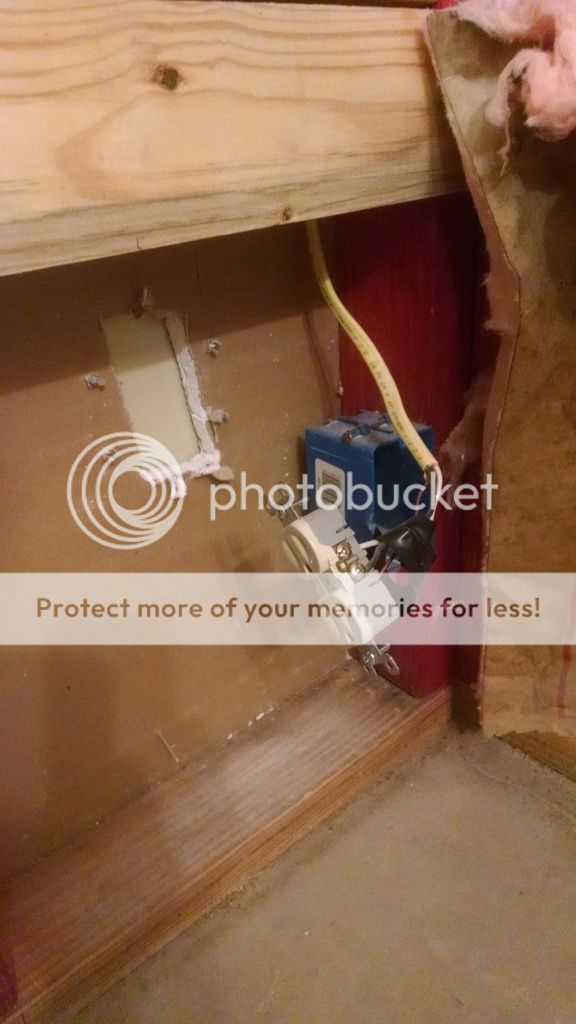
You probably noticed the switch and the accompanying GFCI plug on the wall. The switch controls this plug. It powered the jacuzzi tub, which I never used and this is now an extra circuit. Yes, this is how the builder left the plug. I've got plans for this circuit!
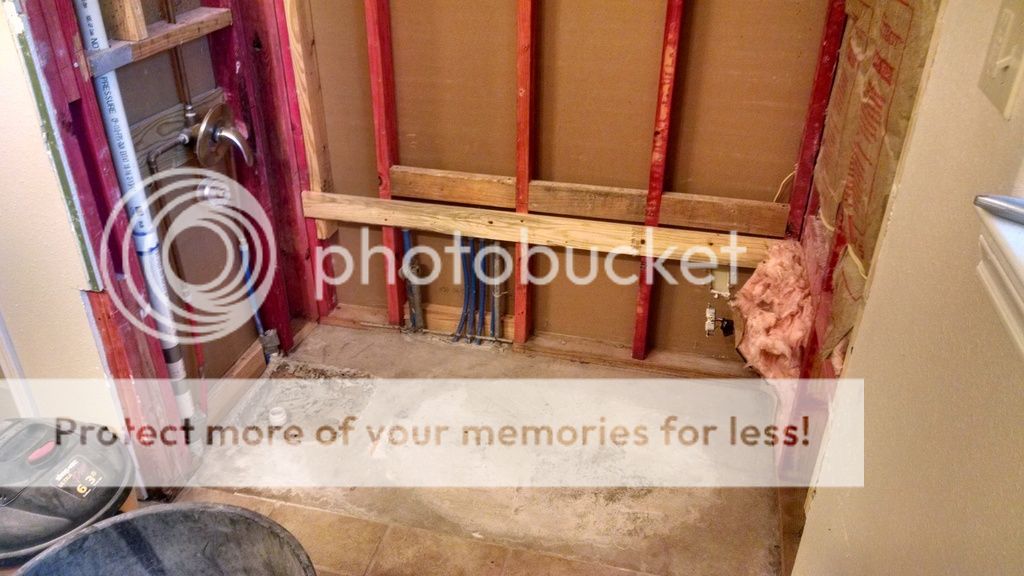
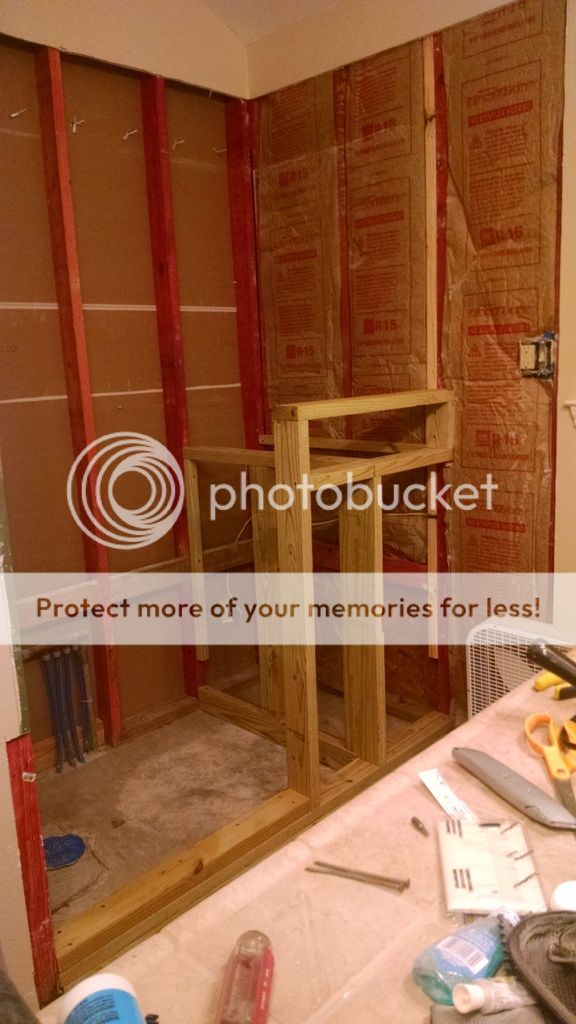
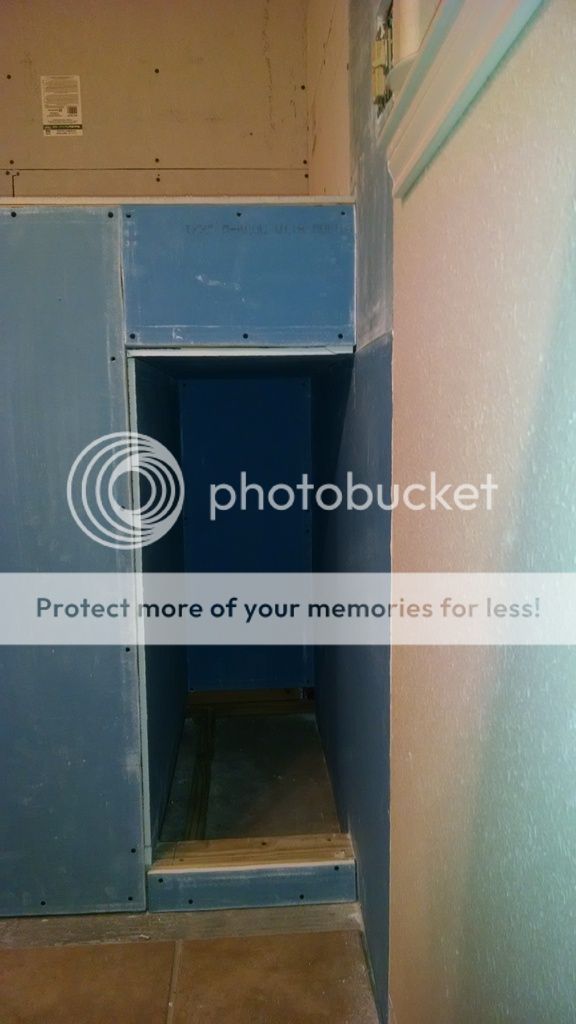
Time to start framing everything up. This bathroom was built without ample storage, specifically for towels and such. They end up taking up room in my closet which for now is cool. However, when I add a companion to my home that will be some valuable space. You'll see a half wall with linen closet taking shape in the following pics. The top of the linen nook will be a product shelf.

It's about this time I decided to expand the scope of the work and figure out what to do with that now obsolete circuit. I've got a great idea! Install a recessed light right above the shower!

Nice cozy work space in the attic would become my... Friend? No... That word doesn't seem to fit the bill...
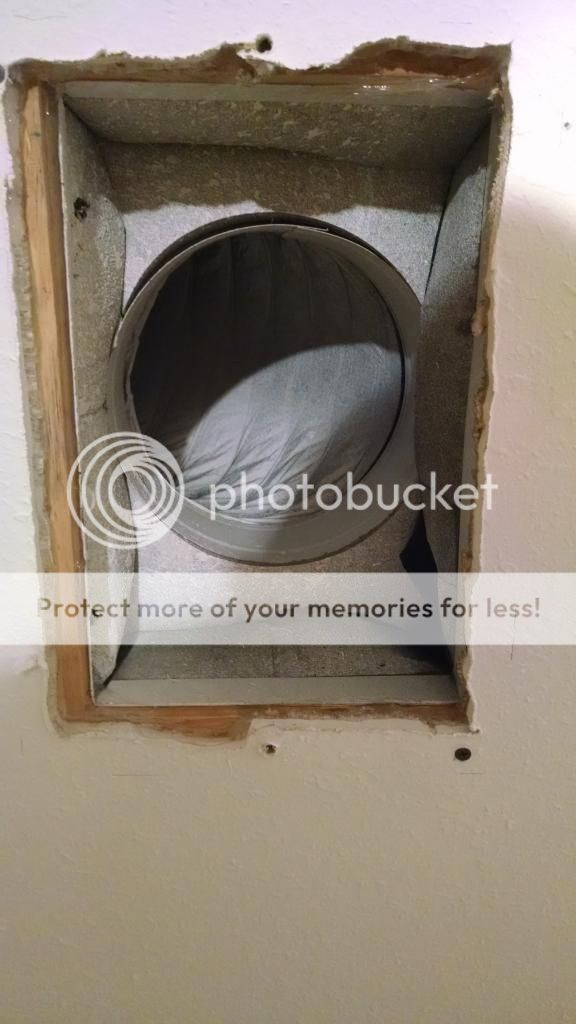
So I cut the hole marked above, and immediately had an "OH SH__!" moment. The vent you see above is directly in the way of the IC rated can I've bought. So, back up in the attic to make some measurements, ponder my failure at life, and head to the home center before they close. Side note.... I live in Beeville. McCoys closes at 6 pm and are closed on Sundays. Sutherlands closes at 7pm and 4pm on Sundays. This whole project, including minor fixes and doing right what the original contractor skipped 7 years ago, was halted several times as I had to wait for the hardware store to reopen. I crawled up in the attic at 4am the next morning to take advantage of the cooler temps to reroute the vent. I took this pic today. It's the first time I've gone back up there. I'll re-lay the insulation, add some more insulation elsewhere (I've got extra from that back wall), and retrieve my pocket knife in October!
It looks like I failed to get photos of the drain rough-in and filling that hole with concrete. I also failed to get pics of roughing in the new mixing valves and adding 1/4 turn ball valves to both hot and cold just above the Pex since the wonderful corner cutter, I mean contractor, didn't install a master shutoff for the whole house. This was also just a good idea again with the limited hours at the home store should something not go perfect.
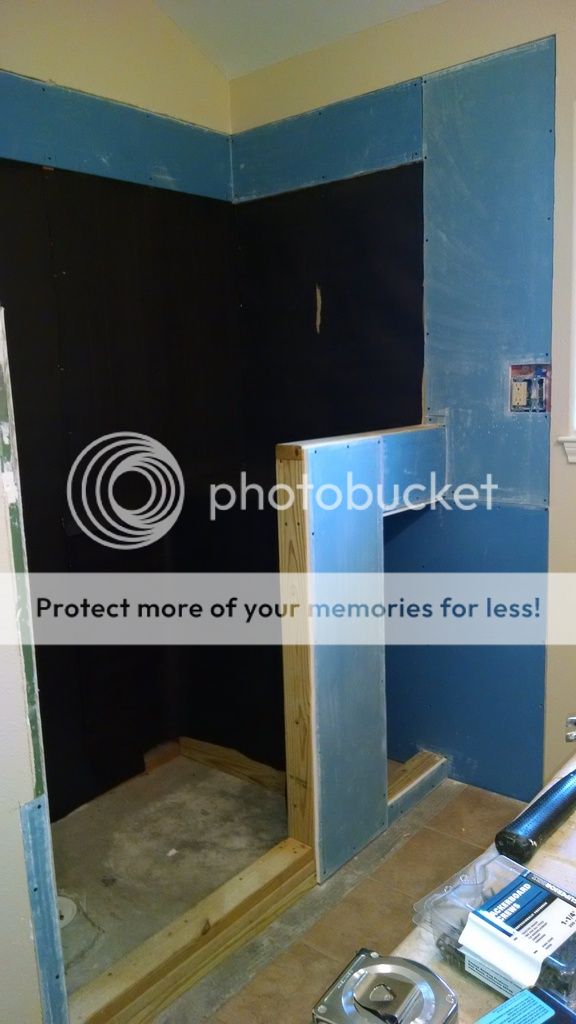
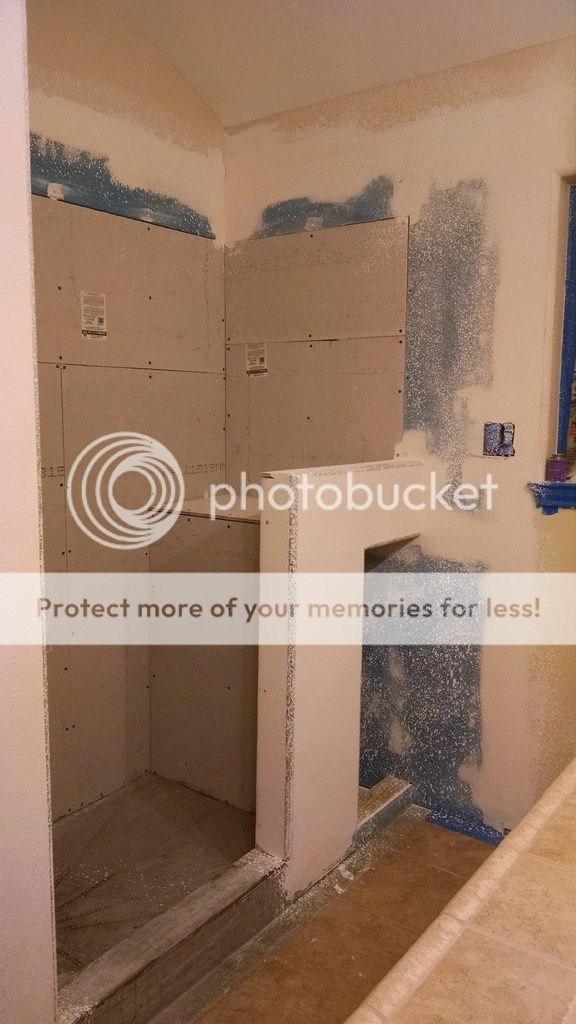
So it's time to get some walls again. Sheetrock went up around the perimeter and tar paper for a moisture barrier over the studs. You can also see the product shelf and linen/towel nook taking shape.
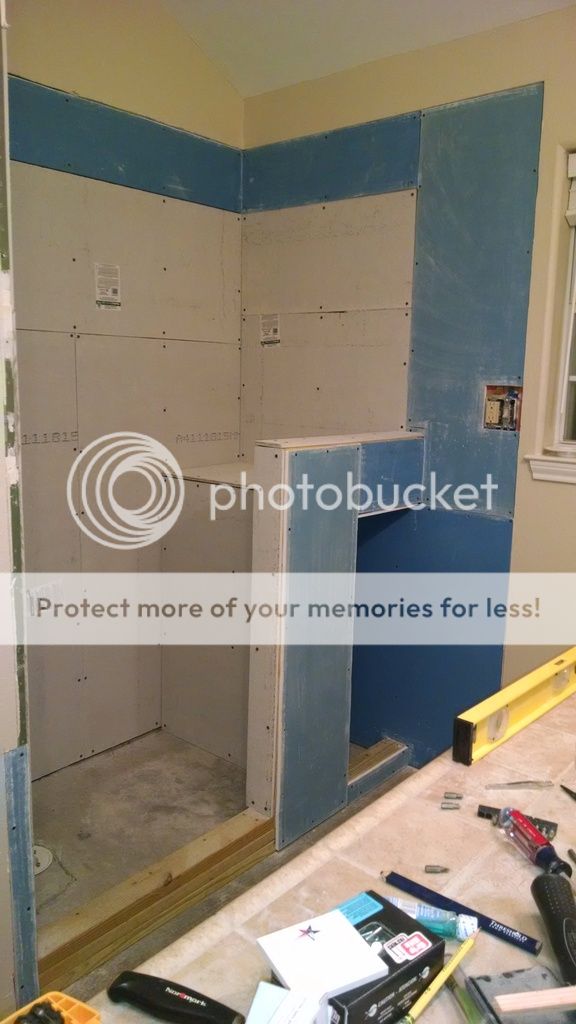
Backer board installed! Those screws are a chore to drive. You'll need a drill with plenty of torque. My 1/2 drive Craftsman corded drill was the MVP that day!
You can also see the roughed in drain and concrete fill...
Two shelves will go in here. Hanging that sheetrock was a tight squeeze at 15 inches wide.
Did I mention the torque it took to drive those screws?

Time to tape, float, and texture. You'll also see the custom pan has been built and is ready to waterproof. I went with the Goof Proof Shower System and I highly recommend it. Read more about them and watch some very informative videos here... Goof Proof Showers
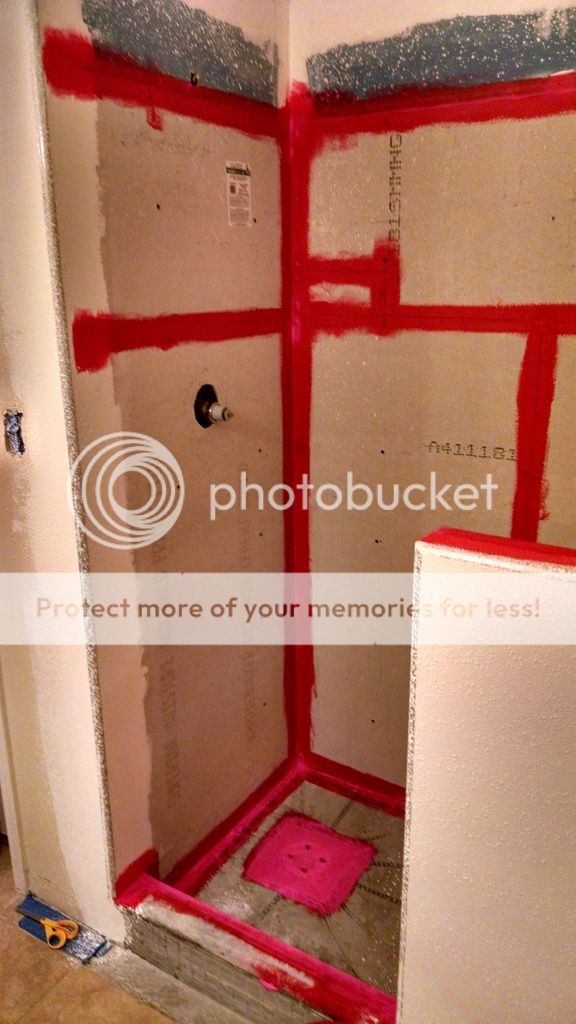
Water proofing and final moisture barrier provided by Red Guard. It goes on pink and drys red. Again, following the recommendations on the Goof Proof website. I didn't get the intermediate pics, but there's now two to three coats covering every wet surface including the floor and all of the seams and corners are taped with the mesh wall tape. The taping is what is completed here.
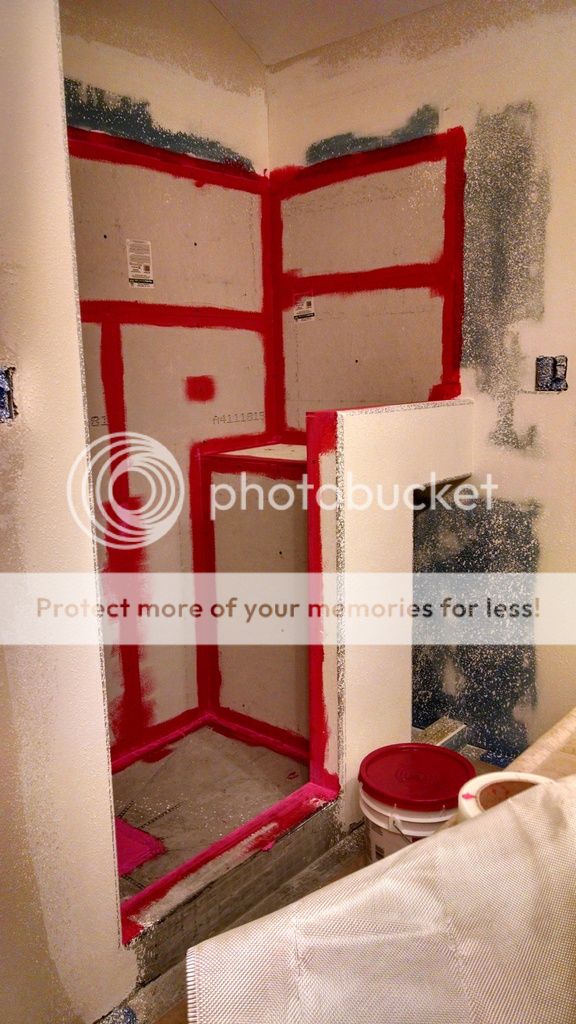
Per instructions you cover the drain with fiberglass cloth with the drain bolts worked through with multiple layers of Red Guard. What I didn't get pics of is after everything is coated red, you put the flange down, then the Goof Proof system has a weep hole protector that goes under their center ring and the whole thing gets mortared in place when you build your sloped tile base.
Finished water proofing and final tile base poured on the Goof Proof forms. Walls are painted. Recessed light is installed. Ready and waiting for tile. I do need to finish building the shelves. I'll paint them when I wrap up the baseboards after the tile is installed.
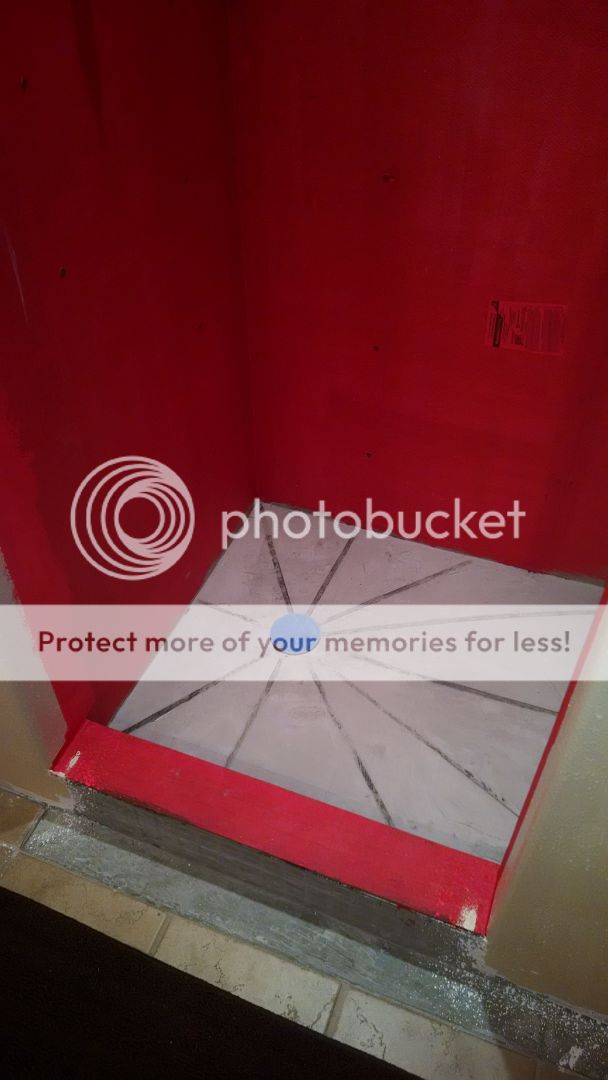

The darker color at the top is the Red Guard over the blue mold resistant sheetrock. The tile will go to just above the red and all the way to the edge of the half wall with a grout edge exposed; no bull-nose tile. I salvaged the narrow course of tile I popped up and those will be cut and re-installed.
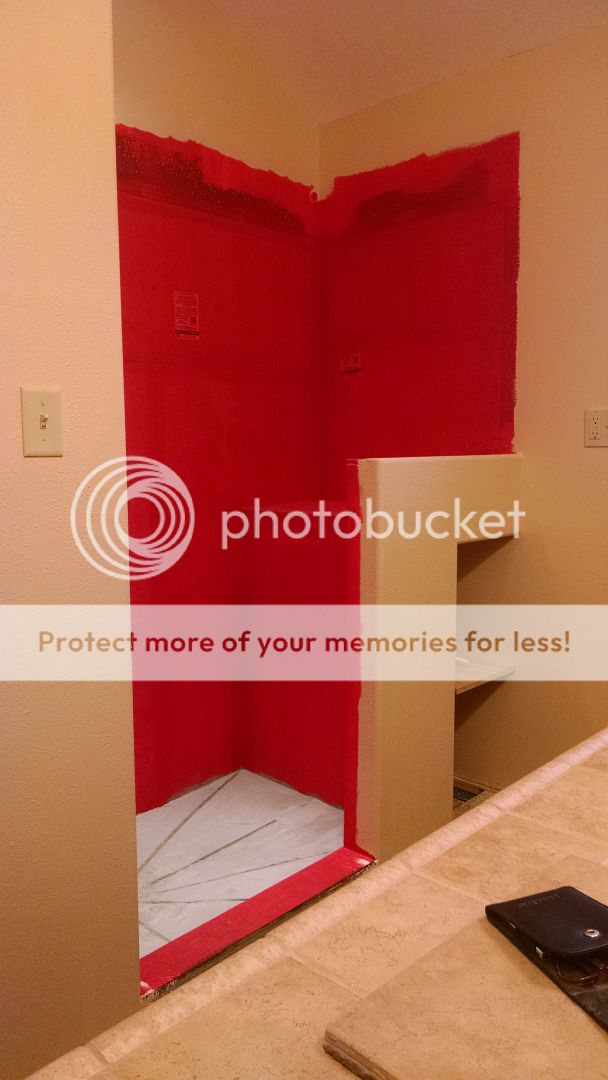
I think that can light turned out really well.

I chickened out and am having a pro do the tile. I'm getting quite furious as nothing has happened in over a month. In an attempt to keep my money local I decided to use a local flooring contractor for new carpets in all 3 bedrooms and the tile. They measured everything, I selected carpets, and I mulled over my tile selection. Within a few days they had a quote for the carpet and I put down a deposit. Same day I turned in my tile selection. The carpet is now in stock and has been for over a month. With constant hounding it took the guy 5 weeks to quote the tile so I could put down a deposit. I would have taken the whole job away from them but they already had my carpet deposit and custom order on hand. I have seen their work, so at least I know it'll be good.
This is by far the largest undertaking on a home I've ever done alone. I enjoyed it, but I have a new appreciation for why people hire a pro! Thankfully I still have a 2nd shower I can use. Don't remind me... I have no doubt that it too was not constructed correctly. That's another project for another budget. I'll retain the tub in that bathroom so the home still has one tub.
I've still got to find a glass shower door guy.
This whole project started when I built a shelf for my office and decided to paint it with trim paint which I didn't have. So guess I'll repaint all the trim and go ahead and repair all the scuffs and scratches I've said I'd get to for several years. The previous owners had large dogs and in the 18 months they owned this house, they did a number of doors, base boards, and several window sills. I decided while painting the baseboards to just cut the bedroom carpets away from the wall as the builder grade carpets are permanently mashed down. Additionally they are the same bland builder beige that was used throughout the home.
While repainting in the guest bath, I realized how the fixtures weren't holding up to humidity and that led to replacing nearly everything in the house to match the style I chose for the new ones. New lights, new faucets, new doorknobs, new cabinet pulls... My poor poor Amex...
Oh, light fixture you say.... Shouldn't there be a box in that wall? There is now! Discovered the same with both vanities in the master. One of them couldn't get a box as there was a double stud running right there...


There's a reason code requires 4 screws to affix an A/C grille box... This small leak is fixed now.

Didn't have enough flex duct, so I built a wooden box shim screwed it through the sheetrock and got the whole mess secured. Then sealed it and every other A/C register with copious amounts of silicon.
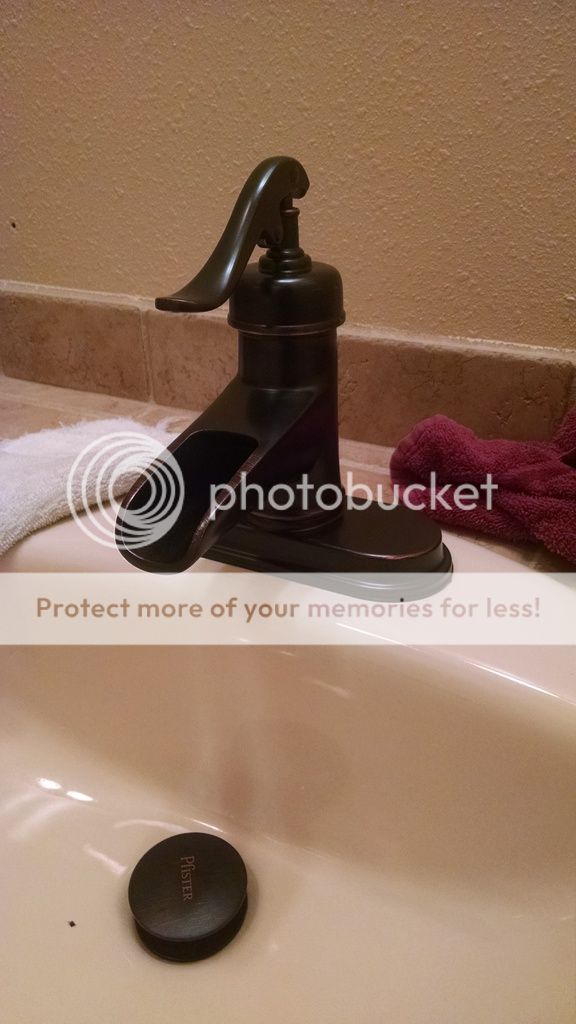
New vanity faucets throughout.
Ok... Some of y'all might recall me being on here several months ago asking some questions about tile and waterproofing a shower. I was prepping to repaint the master bathroom. The master bathroom and bedroom were the last two rooms to need repainting after one project led to another and before I knew it I was repainting the entire house as well as updating most of the hardware and fixtures! Quick job to recaulk the tub and lo and behold, there was the water damage.
What started as a couple of tile popping off of the outer edge of the tub, revealed this...
That obviously doesn't look good, but hey it's just a couple of feet of sheetrock thats only a few inches wide. No big deal. Let me just remove one of the 6x6 tiles to give me more room to work. Wait... Oh no. Thanks to some advise from here, you'll see there's no moisture barrier installed by the builder.
After much deliberation... Out it will come... Out it must come. I'll do the job right, and I might was well turn it into a walk in shower.
Finally getting it all stripped out. With the help from a friend we got the tub out and hauled off the mortar base. Extra sheetrock was removed all around to give me more room to work, as well as a stud to splice back onto.
You'll notice I've also removed one strip of narrow field tile. I'm widening the shower a few inches since it's going to be a fully custom job. This will eliminate the 3" inset in the tub nook. I've also got the drain dug out in prep to move it a few inches away from the wall.
You probably noticed the switch and the accompanying GFCI plug on the wall. The switch controls this plug. It powered the jacuzzi tub, which I never used and this is now an extra circuit. Yes, this is how the builder left the plug. I've got plans for this circuit!
Time to start framing everything up. This bathroom was built without ample storage, specifically for towels and such. They end up taking up room in my closet which for now is cool. However, when I add a companion to my home that will be some valuable space. You'll see a half wall with linen closet taking shape in the following pics. The top of the linen nook will be a product shelf.
It's about this time I decided to expand the scope of the work and figure out what to do with that now obsolete circuit. I've got a great idea! Install a recessed light right above the shower!
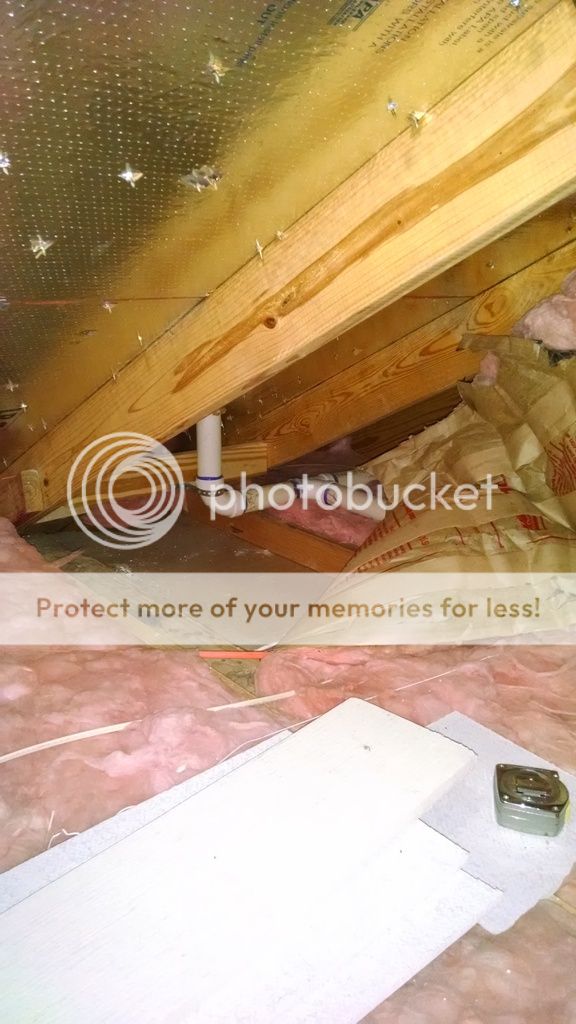
Nice cozy work space in the attic would become my... Friend? No... That word doesn't seem to fit the bill...
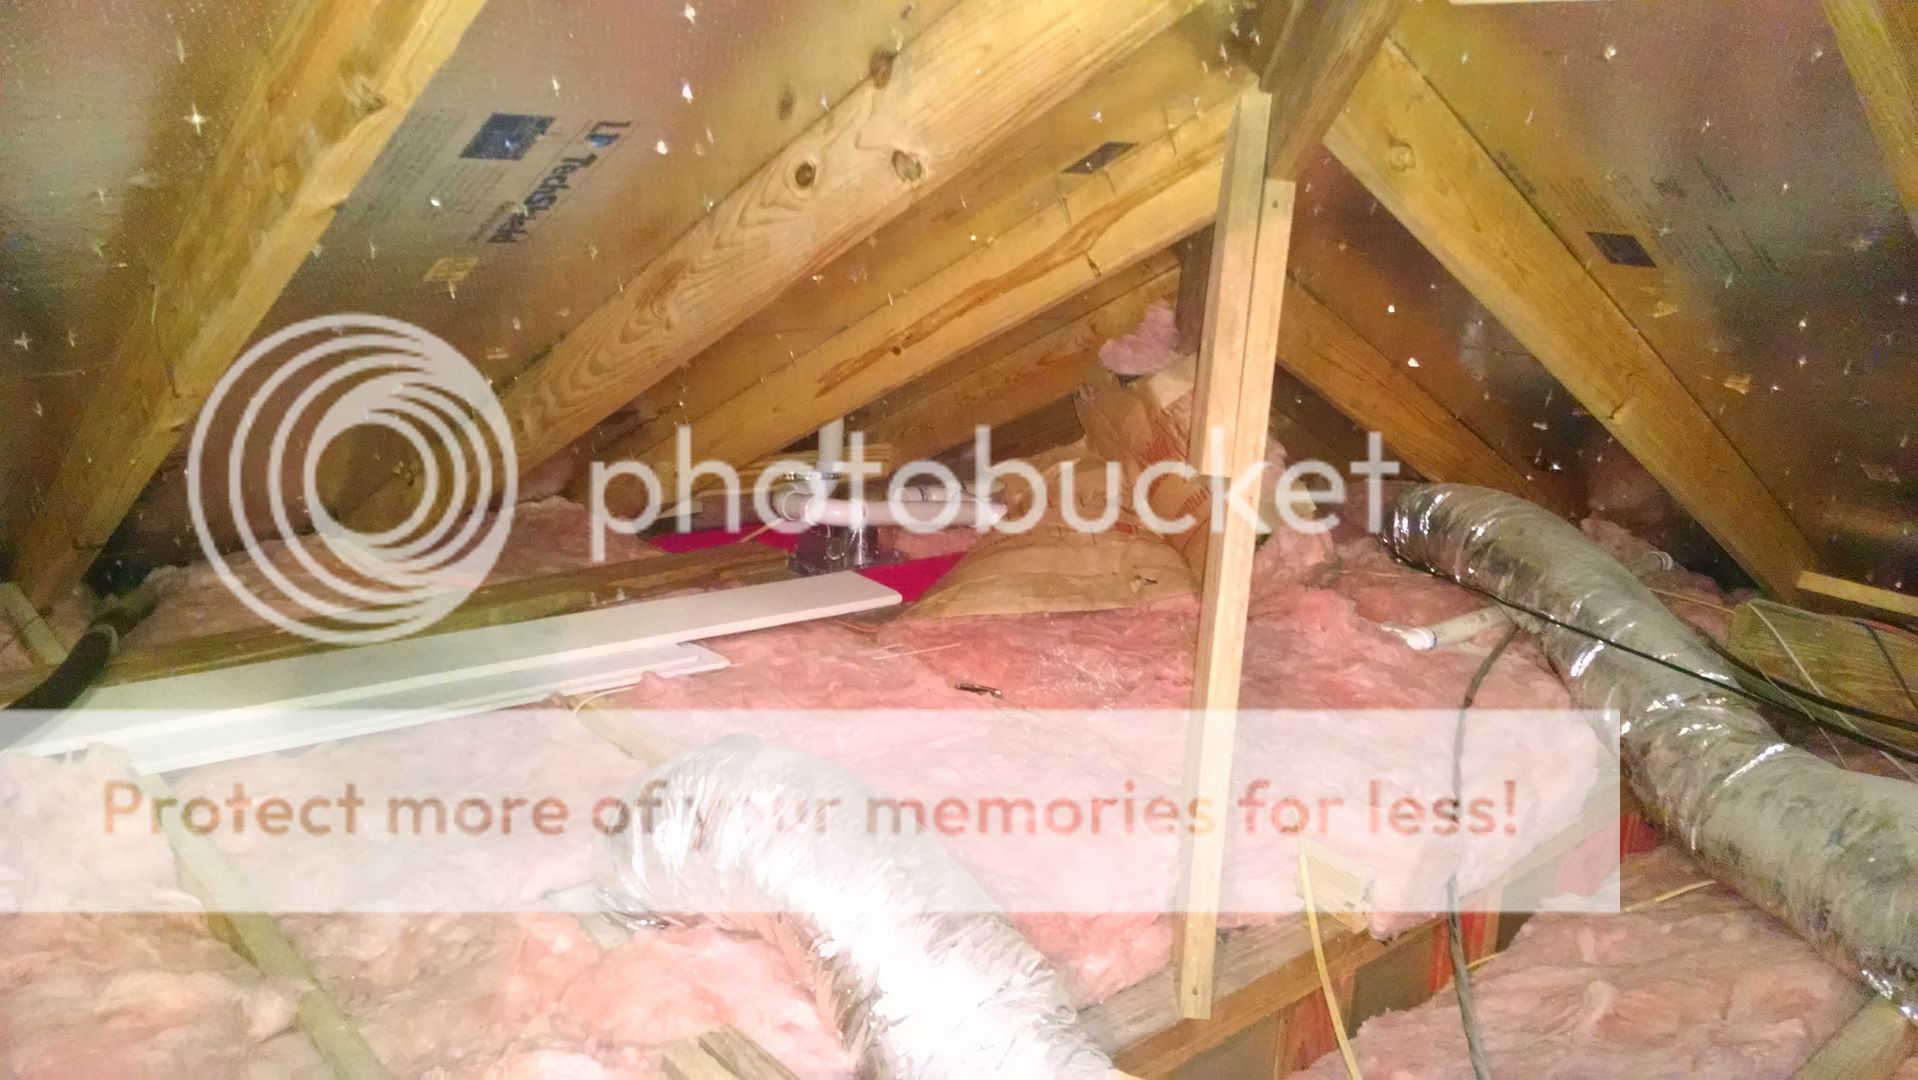
So I cut the hole marked above, and immediately had an "OH SH__!" moment. The vent you see above is directly in the way of the IC rated can I've bought. So, back up in the attic to make some measurements, ponder my failure at life, and head to the home center before they close. Side note.... I live in Beeville. McCoys closes at 6 pm and are closed on Sundays. Sutherlands closes at 7pm and 4pm on Sundays. This whole project, including minor fixes and doing right what the original contractor skipped 7 years ago, was halted several times as I had to wait for the hardware store to reopen. I crawled up in the attic at 4am the next morning to take advantage of the cooler temps to reroute the vent. I took this pic today. It's the first time I've gone back up there. I'll re-lay the insulation, add some more insulation elsewhere (I've got extra from that back wall), and retrieve my pocket knife in October!
It looks like I failed to get photos of the drain rough-in and filling that hole with concrete. I also failed to get pics of roughing in the new mixing valves and adding 1/4 turn ball valves to both hot and cold just above the Pex since the wonderful corner cutter, I mean contractor, didn't install a master shutoff for the whole house. This was also just a good idea again with the limited hours at the home store should something not go perfect.
So it's time to get some walls again. Sheetrock went up around the perimeter and tar paper for a moisture barrier over the studs. You can also see the product shelf and linen/towel nook taking shape.
Backer board installed! Those screws are a chore to drive. You'll need a drill with plenty of torque. My 1/2 drive Craftsman corded drill was the MVP that day!
You can also see the roughed in drain and concrete fill...
Two shelves will go in here. Hanging that sheetrock was a tight squeeze at 15 inches wide.
Did I mention the torque it took to drive those screws?
Time to tape, float, and texture. You'll also see the custom pan has been built and is ready to waterproof. I went with the Goof Proof Shower System and I highly recommend it. Read more about them and watch some very informative videos here... Goof Proof Showers
Water proofing and final moisture barrier provided by Red Guard. It goes on pink and drys red. Again, following the recommendations on the Goof Proof website. I didn't get the intermediate pics, but there's now two to three coats covering every wet surface including the floor and all of the seams and corners are taped with the mesh wall tape. The taping is what is completed here.
Per instructions you cover the drain with fiberglass cloth with the drain bolts worked through with multiple layers of Red Guard. What I didn't get pics of is after everything is coated red, you put the flange down, then the Goof Proof system has a weep hole protector that goes under their center ring and the whole thing gets mortared in place when you build your sloped tile base.
Finished water proofing and final tile base poured on the Goof Proof forms. Walls are painted. Recessed light is installed. Ready and waiting for tile. I do need to finish building the shelves. I'll paint them when I wrap up the baseboards after the tile is installed.
The darker color at the top is the Red Guard over the blue mold resistant sheetrock. The tile will go to just above the red and all the way to the edge of the half wall with a grout edge exposed; no bull-nose tile. I salvaged the narrow course of tile I popped up and those will be cut and re-installed.
I think that can light turned out really well.
I chickened out and am having a pro do the tile. I'm getting quite furious as nothing has happened in over a month. In an attempt to keep my money local I decided to use a local flooring contractor for new carpets in all 3 bedrooms and the tile. They measured everything, I selected carpets, and I mulled over my tile selection. Within a few days they had a quote for the carpet and I put down a deposit. Same day I turned in my tile selection. The carpet is now in stock and has been for over a month. With constant hounding it took the guy 5 weeks to quote the tile so I could put down a deposit. I would have taken the whole job away from them but they already had my carpet deposit and custom order on hand. I have seen their work, so at least I know it'll be good.
This is by far the largest undertaking on a home I've ever done alone. I enjoyed it, but I have a new appreciation for why people hire a pro! Thankfully I still have a 2nd shower I can use. Don't remind me... I have no doubt that it too was not constructed correctly. That's another project for another budget. I'll retain the tub in that bathroom so the home still has one tub.
I've still got to find a glass shower door guy.
This whole project started when I built a shelf for my office and decided to paint it with trim paint which I didn't have. So guess I'll repaint all the trim and go ahead and repair all the scuffs and scratches I've said I'd get to for several years. The previous owners had large dogs and in the 18 months they owned this house, they did a number of doors, base boards, and several window sills. I decided while painting the baseboards to just cut the bedroom carpets away from the wall as the builder grade carpets are permanently mashed down. Additionally they are the same bland builder beige that was used throughout the home.
While repainting in the guest bath, I realized how the fixtures weren't holding up to humidity and that led to replacing nearly everything in the house to match the style I chose for the new ones. New lights, new faucets, new doorknobs, new cabinet pulls... My poor poor Amex...
Oh, light fixture you say.... Shouldn't there be a box in that wall? There is now! Discovered the same with both vanities in the master. One of them couldn't get a box as there was a double stud running right there...
There's a reason code requires 4 screws to affix an A/C grille box... This small leak is fixed now.
Didn't have enough flex duct, so I built a wooden box shim screwed it through the sheetrock and got the whole mess secured. Then sealed it and every other A/C register with copious amounts of silicon.
New vanity faucets throughout.