building closet shelving...question about securing to wall

20,331 Views | 13 Replies | Last: 12 yr ago by CapCity12thMan
CapCity12thMan
How long do you want to ignore this user?
I am planning to build some closet shelves. Details:

closet it 35" wide and we would like a hanging rod on the left half, and shelves on the right half. This is the structure I have chosen:
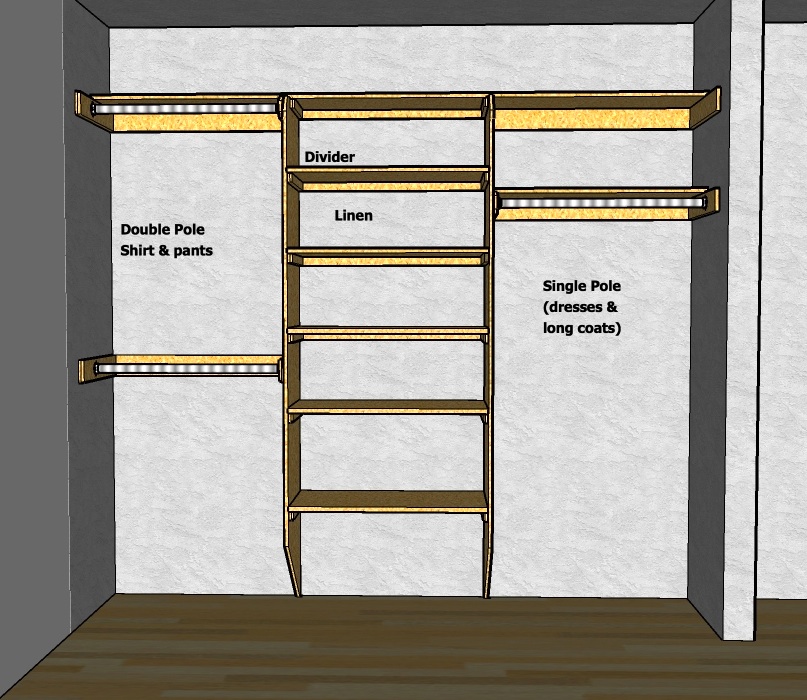
Two exceptions:
1) no second rod halfway up, only one at top
2) ignore the right third of the drawing in this image

This closet will be used for papers, crayons, art stuff for kids, random crap like that.

Anyway - I already drew up and measured things to essentially build the "box" of shelves with the open back. I am planning on having the two vertical pieces angle cut as shown, but NOT rest on the ground, as I saw elsewhere that it might be a good idea to leave room for floor space for larger items.

My questions:

a) I would prefer to NOT have the side ledger boards on the inside of the box. Could I just have the one in the back and then screw in from the outside of the vertical pieces into each shelf? probably at least 2 screws probably 3?

b) How do the vertical pieces get secured to the back wall? I can't seem to understand this from the image. I understand the back ledger boards would be in stud, and each shelf would rest on top and I could screw them down into it vertically like that, but how is the rest of the structure supported?

help/advice? I am not a carpenter, but would enjoy this type of stuff and planning on doing more of it. Handy with most everything electrical since that stuff might kill me, I choose not to screw with it.
baumenhammer
How long do you want to ignore this user?
gonna need to know material choice before i can comment on screws vs ledger board.

if you're going with mdf / particle board no way in hades i'd rely on screws for it.

If you REALLY want to get rid of those ledgers, your best bet would be a dado joint.

As for securing the verticals to the wall - ledgers are your best bet.
CapCity12thMan
How long do you want to ignore this user?
not MDF - birch probably?

quote:
As for securing the verticals to the wall - ledgers are your best bet.


how? this is where I don't understand - you mean vertical ledger boards?
baumenhammer
How long do you want to ignore this user?
yeah. toe-nail them to the wall witha nail gun - altering direction of the nail slightly (not in at 90 deg - closer to 60-75 deg in altering direction to give strength / resist pull out) Then use that as a nailing-strip for the vertical boards.

When you say birch, are you talking birch plywood?

If so, just remember ply has great strength in plane, but dont try to run a screw into the side of it - it will just separate / pull right out of there.

If going with a solid wood, id think poplar would be a nice option, or you could just use pine if its a cheaper project.
Esteban du Plantier
How long do you want to ignore this user?
I hate toe nailing. It would look much cleaner if you used a pocket hole jig and screwed them to the wall.

And your diagram looks a lot wider than 35"
CapCity12thMan
How long do you want to ignore this user?
vigna - not my diagram, just found one on the web to use as a concept. Also note where I said I am NOT dong the 3rd column option, so only the first two are in play.

hammer - vertical ledger boards, what 1x2? Don't they need to be in studs?
Rexter
How long do you want to ignore this user?
if you are building as designed with the foot resting on the floor, there will not be much stress on the vertical pieces. i would nail the ledgers to studs, then nail the verticals to the ledgers on the back edge. i would use hardwood shelving instead of ply.

here is mine after moving and adding shelves and rods. the added stuff is unpainted in the pic.


[This message has been edited by Rexter (edited 9/14/2013 1:26p).]
CapCity12thMan
How long do you want to ignore this user?
I can't tell from the quality of that pic, but are there vertical ledgers that the center vertical piece is nailed into?
Rexter
How long do you want to ignore this user?
there is a ledger all the way around under the bottom shelf and the new side board. the center divider is not one piece. each shelf is one piece with the bottom divider nailed in from the bottom and top. each piece above that is nailed from the top through the shelf and toe-nailed at the bottom. on the new side there are ledgers under each shelf since they are nailed in from the side. there are vertical ledgers to hold the side to the wall as well.
Aggie1
How long do you want to ignore this user?
studs, angle bracing, and cross pieces attached to studs are your best friends - besides resting directly on the floor...
Assuming there will be little weight is a bad assumption.
Clothing is VERY heavy as well. Angle bracing (either triangular wood on a backer or store bought metal ones) at least every 32 inches (on studs!) and you will never have a problem.
CapCity12thMan
How long do you want to ignore this user?
almost finished, only paint to go. Most of it turned out how I expected. This was also just a personal challenge to see if I could do this little project myself.


[This message has been edited by CapCity12thMan (edited 11/7/2013 9:46a).]

[This message has been edited by CapCity12thMan (edited 11/7/2013 9:46a).]

[This message has been edited by CapCity12thMan (edited 11/7/2013 9:47a).]
annyong
How long do you want to ignore this user?
CRM1712
How long do you want to ignore this user?
How did you fasten the verticals to the wall?
txag2008
How long do you want to ignore this user?
quote:
How did you fasten the verticals to the wall?


Not sure how he did it but it really should need must fastening. Could run pocket screws on the inside of the vertical piece, but really just fastening to the top shelf and all the horizontal shelves should be fine.
CapCity12thMan
How long do you want to ignore this user?


Final with paint.

Details and answers to any questions:

1) the vertical ledger board is a 1x2 running down a stud, secured with 3" screws.
2) The vertical wall is a 1x12 that is flush to the back wall and screwed with 2" screws into vertical ledger board.
3) The top shelf is supported with 1x4 ledger boards and is screwed into the vertical wall also.
4) 1x2 ledger boards along back wall under each shelf and along outer wall
5) The shelves are secured to the vertical wall with screws.
6) The shelves are secured to ledger boards with screws
7) All screws were recessed into the wood
8) all screw holes and wood-wood joints spackled, sanded and painted (see previous pic).
9) paint used is the matching trim paint in the house (see pic), which is a water based paint. I always thought trim was oil based enamel but for some reason in this house it is water based. Oh well.
10) closet rod going in on left side for hanging stuff


I am pretty sure a nail gun would have saved me a lot of time, but I don't have one and didn't think trying to gets good structure in all those corners and tight places with a hammer was possible without damaging the wood everywhere.
Refresh
Page 1 of 1
 
×
subscribe Verify your student status
See Subscription Benefits
Trial only available to users who have never subscribed or participated in a previous trial.