Home Improvement
Sponsored by

Building a Table questions

6,819 Views | 18 Replies | Last: 11 yr ago by baumenhammer
txag2008
How long do you want to ignore this user?
AG
I've drawn up a table within Sketchup that I'd like to try my hand at building. For the most part it should be pretty straight forward but there are 2 things that I'd like to hear some opinions on.
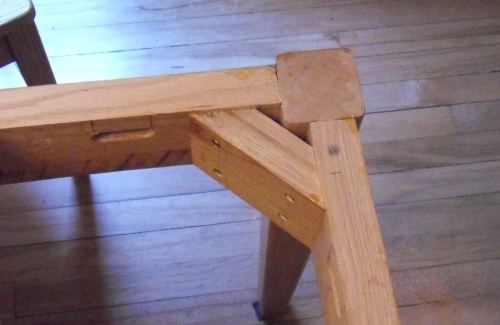
  • First, what would be the easiest way to secure the mitered 4x4s at each corner of the table? (I don't have a biscuit joiner)
  • What would be the best way to cut the through mortises for the 4x4s for the bottom supports on each end of the table?


[This message has been edited by txag2008 (edited 2/21/2013 2:07p).]
capn-mac
How long do you want to ignore this user?
On the mitres, there's only a few bajaliion options.

Saw a kerf into the faces of the mitres and slip something in those kerfs, thin ply wood, hardboard, what not.

Depending on how you are lapping the field boards of the table in, you could simply use T-bolts across the miters.

Now, for the stretchers, you have a couple options.
One is to get a forstner but and hog out the majority of the mortice, then clean it up with a chisel.

Alternately, bore a hole (or two) through the leg. Cut the stretcher to fit, and bore matching holes in it. Run dowels through the leg into the the stretcher. Take the cut off bit and apply it to the dowels protruding through the leg.

Authentic? No. But, some easier with a limited tool set.
capn-mac
How long do you want to ignore this user?
Something I learned early on in my furniture design life is that, with tables, an apron is your friend. It gives you a frame to hold the legs nice and rigid, and give a place to support the table surface.

That latter can also be quite thin, too, and only actually built-up at the edge.

Further, table legs needs tapers, even the square, simple ones. I'd take a wedge 3/4" off the inside of the morticed side of each leg. Eyeballing the primative I just extruded in AutoCAD, taking a 1/4" off both the transverse sides (parallel to the mortice) would look nice. If with needing three passes each with the tapering jig on the table saw.
Would make the actual foot 2-3/4" x 3", which would allow use of a 2" diameter floor button.
Macpappy99
How long do you want to ignore this user?
AG
Here's a link to a plan that might give you a few ideas.

http://ana-white.com/2011/07/plans/benchright-farmhouse-table
Angelo80
How long do you want to ignore this user?
AG
Pocket screws and glue would work well for the miters. Put on inside and bottom and fill with a dowel to hide if you wish. I usually glue also. There is an argument (not sure if I totally agree or not) that biscuits don't add any strength to a joint but only help with alignment.

I agree that forstner bit and a sharp chisel will do a good job with the mortises.

I would also second the benefit of the apron.

[This message has been edited by Angelo80 (edited 2/23/2013 6:59a).]
No material on this site is intended to be a substitute for professional medical advice, diagnosis or treatment. See full Medical Disclaimer.
wunderbrad01
How long do you want to ignore this user?
AG
Lovely table. I'm jealous, I have no time for fun stuff like that right now.

2 things: I would take away the 3 boards underneath and purchase or rent a biscuit joiner. It will make it that much better. If you're going to the trouble to build it, spend the $100 or so on a cheap tool, or $200 on a nice one, and do it right.

Second, the dowel rod on the bottom looks a little flimsy to me. I can see that breaking from being a footrest. Everything else on the table is squared off, I would suggest using rectangular lumber.
Post removed:
by user
txag2008
How long do you want to ignore this user?
AG
I added on an apron and think I like the look of it and as mentioned will probably make it easier with my mitered 4x4 corners.


quote:
Now, for the stretchers, you have a couple options.
One is to get a forstner bit and hog out the majority of the mortice, then clean it up with a chisel.

Good suggestion with the forstner bit and chisel. I see that as the most straightforward way of doing it but just don’t know hard it will be to do on the 4x4s.

quote:
Alternately, bore a hole (or two) through the leg. Cut the stretcher to fit, and bore matching holes in it. Run dowels through the leg into the the stretcher. Take the cut off bit and apply it to the dowels protruding through the leg.
I’m having a hard to picturing this suggestion. Sounds interesting though.

quote:
Further, table legs needs tapers, even the square, simple ones.
Usually I would agree but with this type of table I like the square legs. I also think that tapered legs would be odd with the stretchers.

quote:
2 things: I would take away the 3 boards underneath and purchase or rent a biscuit joiner. It will make it that much better. If you're going to the trouble to build it, spend the $100 or so on a cheap tool, or $200 on a nice one, and do it right.
Why do you say that it will make it much better? In my eyes it wouldn't add any strength.

quote:
Second, the dowel rod on the bottom looks a little flimsy to me. I can see that breaking from being a footrest. Everything else on the table is squared off, I would suggest using rectangular lumber.
I’ve envisioned that rod on the bottom to be black iron pipe. It’d give it kind of an industrial feel which I kind of like. I did see the same thing used but it was on a much taller table and the pipe stretchers served has foot rests and gave it a neat look.


[This message has been edited by txag2008 (edited 2/23/2013 3:50p).]
capn-mac
How long do you want to ignore this user?
You might want to move the long-axis apron back into contact with the legs.

Optimally, the apron is what corrals the legs into a rigid form, and the top balances atop that.

Brain engaged yesterday, I clean forgot to give you an option on the stretchers. Presuming you are using 6/4 stock for the stretcher, you could use a 1-1/2" Forstner at the exact top & bottom of the mortice (hog out in-between as needed). You then could take a router with a 3/4" cove bit and get a round-over on the tenon part of the stretcher. You'll need to fuss a bit at the shoulders to get a good fit.

On the doweling it, if we picture the leg & stretcher combo as
-|---|-
You can cut the stretcher into three pieces:
- --- -
Which can be fastened to the legs by way of through-dowels =|= on the legs.
Or, you could counter-bore the leg for a lagscrew into the stretcher, then dowel the "tenon end" on over that.

I learned the hard way not to start out with half-lapped tenons secured with transverse wedges. Not with just hand tools <sigh> . (Interlocking through half-laps on the apron were a less-good learning experience, too.)
txag2008
How long do you want to ignore this user?
AG
capn-mac,
I'm following your suggestion now. (I got a kick out of your use of dashes to represent it, but it did the trick) It seems like it would definitely work and look authentic like you said but I wonder about the strength of it using the dowels.

quote:
You might want to move the long-axis apron back into contact with the legs.

Optimally, the apron is what corrals the legs into a rigid form, and the top balances atop that.
That had never crossed my mind to move the apron in to match the perimeter of the legs. I had drawn in some triangle supports on the legs that would help support the legs if I didn't end up moving the apron in.

capn-mac
How long do you want to ignore this user?
One of these days, I'll toss the site-owners some cash (I'm needing gainful employment, sadly), AND, decide on which online image hosting sight to afflict with my wasted electrons. At which point, I'll be able to include higher-speed graphics. (IRC roots showing in being able to use ASCII to graph stuff <G> ).

Strength of dowels also why I included counter-bored Lags to hold the stretcher to the legs.

If a person learns furniture design as I did, ad hoc and RTA and moving a gazillion times, you find yourself learning a thing or two.

One of those is that it is really easy to forget that the top of a table leg is subject to lots of torsional stress. Some of that you can equalize with stretchers and braces and the like. But, that apron is your friend.

For one, it's not down with the feet of the seated or the seats. For another, it gives excellent right-angle purchase to hold the legs. It's also handy for hiding the hardware for sliding-leaf tables (if not germane to this specific table).

Of course, learning this stuff just leads to more. Things like blind dovetails to joint the apron to legs. Or that a square apron will hold an oval-top table. Or that Hâfele, Lee Valley, and Rockler catalogs are just pr0n of a different sort <G>

(If you get it really bad, you'll know when you start building boats--I know I built 12/8 boats, 5/8 of one and 7/8 of another <sigh> )

Prince Akeem
How long do you want to ignore this user?
quote:
There is an argument (not sure if I totally agree or not) that biscuits don't add any strength to a joint but only help with alignment.

I think that was their original intent. It is better than just a simple butt joint.

The stretchers I would shorten and have them connect to each leg instead of wrapping around like your current picture. I would do something like this:

Adds nice support for the table top and legs like the capn mentioned above.


capn-mac, are you a furniture maker? Or just a hobbyist?
txag2008
How long do you want to ignore this user?
AG
quote:
The stretchers I would shorten and have them connect to each leg instead of wrapping around like your current picture. I would do something like this:


When you suggest to shorten the stretchers, are you talking about the apron?
Prince Akeem
How long do you want to ignore this user?
Yes. Sorry. Not enough coffee at that point in the morning. Short the apron.

Though on further inspection, I do like the look of the underside in your picture. I didn't notice the supports earlier.
capn-mac
How long do you want to ignore this user?
quote:
capn-mac, are you a furniture maker? Or just a hobbyist?


Have been a professional designer, if as an adjunct to being a casework designer.

But, I've built furniture for myself--just not for hire.

I also have been using ACAD for donkey's years--as realistic 3D started evolving in the product, the best way to get furniture into a space for rendering is to "build" it as a separate 3D model you can install as a Block.

Boat building almost natural, what with the amount of time I've spent upon the water. But, it really came from having built a couple of wooden flag poles, which are really just wooden masts, and once you have that material, and the building to store it in, and a few minutes of spare time . . .

[This message has been edited by capn-mac (edited 2/28/2013 6:24p).]
baumenhammer
How long do you want to ignore this user?
AG
I tend to like an apron for construction purposes myself... but the thickness of the top might complicate that...

Think about chair height and leg clearance when sitting at the table.

Typically for a standard height dining table, you'll want at least 24" of vertical clearance under the table for leg room.

A standard height for a dining table is 28-30"

a 4" thick top (due to the mitered perimeter), plus a 2-3" apron reveal will leave your legs coming uncomfortably close to the apron...

(I have this situation on my dining room table due to poor planning...)

It looks really nice, but it can be uncomfortable to sit at.

I think you can get the function of the apron, with a 'hidden' apron pretty easily.

Go with 1-by for the top boards and keep the 4-by perimeter frame.

Then rip a 2x4 down to a 2x3 to serve as your hidden apron and the lateral supports of your table top. The added thickness will make it a little easier to secure the legs to it. The angles you added are always a good suggestion as well.

It looks like the table that inspired the leg design you're going for used trippled up 2x4s for the leg, not a 6x4.

Some time spent matching grain, and milling to ensure they're square, and trippled up 2x4 makes it a lot easier. (and probably cheaper too)

With the planks on the top, consider rabbetting them to overlap.

On an earlier table of mine, i had butt-jointed planks that separated over time. Spills would drop straight through to the floor... Big mess.

[This message has been edited by baumenhammer (edited 3/1/2013 11:28a).]
txag2008
How long do you want to ignore this user?
AG
great suggestions baumenhammer

quote:
Think about chair height and leg clearance when sitting at the table.

The vertical clearance is definitely something that has crossed my mind. I have been meaning to sit down at a normal height table and see how far my apron will be able to come down.

quote:
It looks like the table that inspired the leg design you're going for used trippled up 2x4s for the leg, not a 6x4.
You're right, they used 3 stacked 2x4s. I thought the look of the 4x4 would be much better so I've been trying to move forward using that. I'd like to stay away from milling stacked 2x4s to achieve that look.

quote:
With the planks on the top, consider rabbetting them to overlap.
Interesting suggestion, I had never thought about that. I would need to get me a dado blade. (It was so much easier having all my dad's tools to use growing up.....)
agrams
How long do you want to ignore this user?
AG
08, have you given consideration to wood movement?

The breadboard/mitered corners will move less relative to the boards at the body of the table.

I wold be leery of the main boards expanding and shrinking more than that breadboard ends and causing gaps as the woods expands or contracts at different rates.

Also, given consideration to movement of the top relative to the base. They have 'figure 8' fasteners that you can use to hold the top to the base that allow for slight movement.
baumenhammer
How long do you want to ignore this user?
AG
you can do a short rabbet and simply adjust the fence to compensaye for the lack of a dado, or use a router...

I tend to do the multiple passes ovrr the table myself.
baumenhammer
How long do you want to ignore this user?
AG
a challenge with 4x4s in finished furniture is stain consistency.

they tend to have very different face grain on perpendicular surfaces and take the stain quite differently.

[This message has been edited by baumenhammer (edited 3/4/2013 9:52a).]
Refresh
Page 1 of 1
 
×
subscribe Verify your student status
See Subscription Benefits
Trial only available to users who have never subscribed or participated in a previous trial.