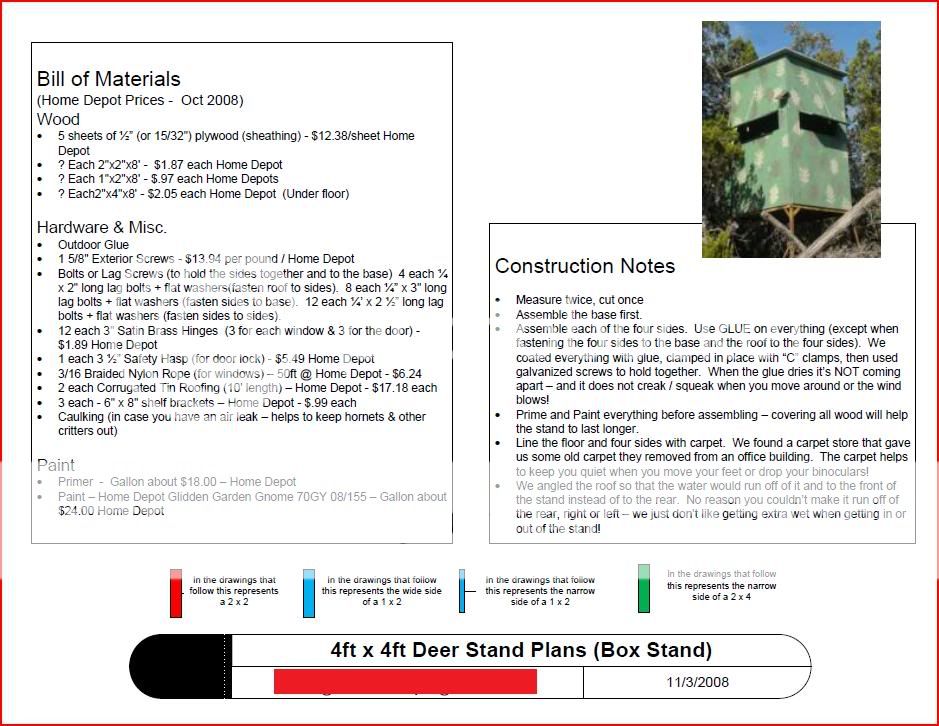
I recently got a new job and had 2 weeks off until my new employer wanted me to begin. So, with my free time I decided to build a deer stand. Many of y’all have probably seen a few pictures of the 4x4 stands that I have built before and the blue prints that my dad created, but this time I decided to build one a little bit bigger for my wife and I to hunt in.
The stand is made up of 8 different sheets of plywood. Two panels for the front and back side on the 8 foot sides, one single piece on the left and right ends measuring four feet wide, and then one sheet for the roof and another one for the floor.
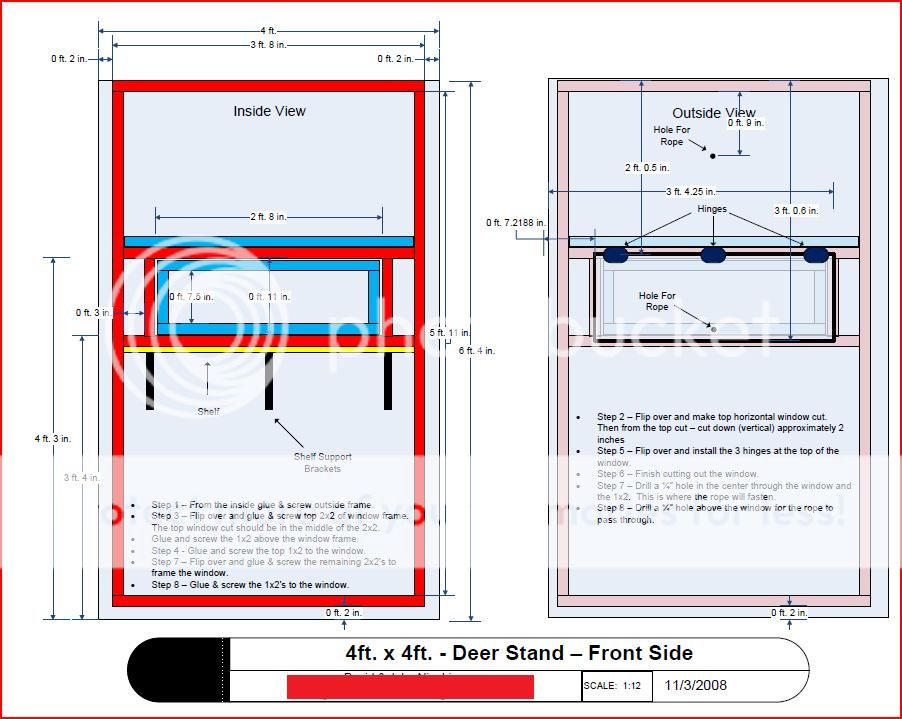
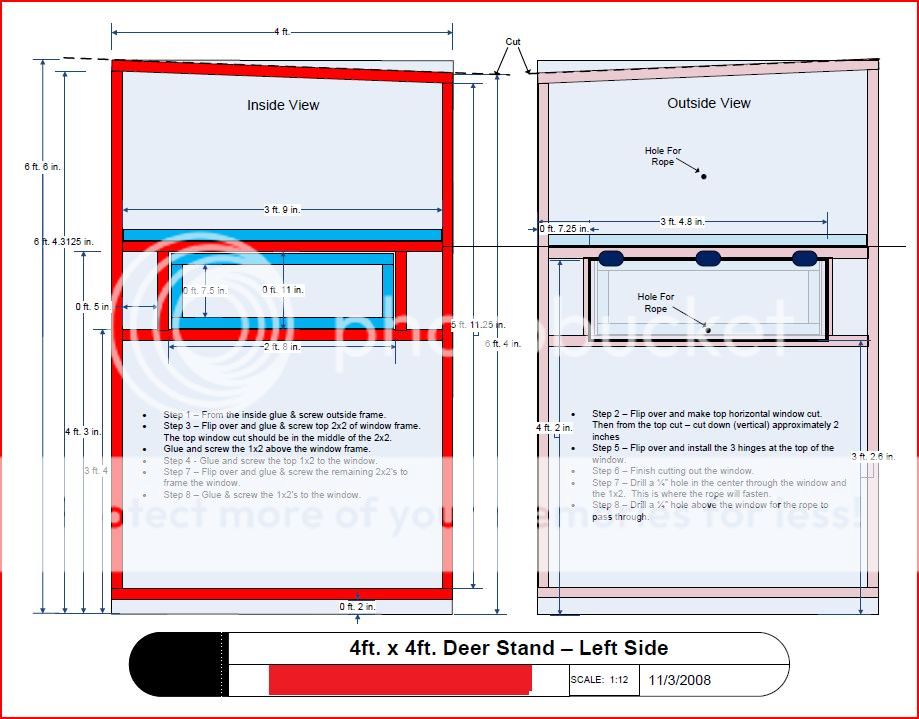
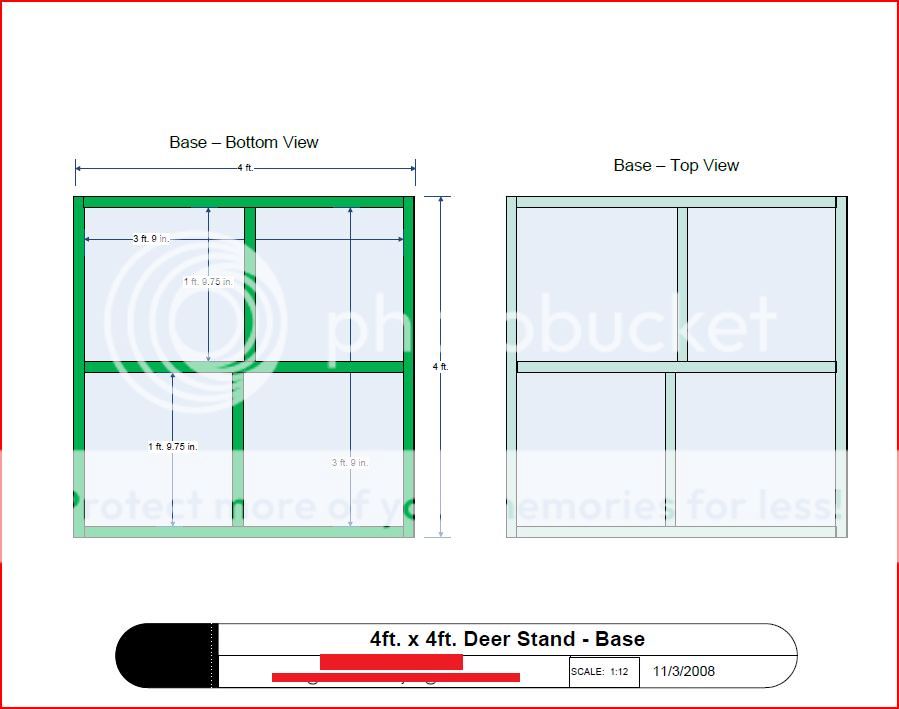
I framed the perimeters of each sheet of plywood with 2x2’s and the area around each window cutout is also framed with 2x2’s. The window flap is framed out with 1x2’s to keep it from warping in the future. The base of my stand is framed out with 2x4’s and 3/4” plywood. I also made sure that I put wood glue on every single piece of wood that is screwed to the plywood making it last longer and keeping it from squeaking.
I went ahead and attached pictures and a few youtube links to some short videos. I have sent a few of y’all my plans in the past and I really wanted to document this project for future deer stands that I build and to also share with my buddies.
Here is my first completed panel. I believe this is the front left side

Here is a close up of the window. Framed with 2x2’s and 1x2’s. The 2x2’s are centered on the window cutouts so the window is able to shut flush and tightly. Once I put up my stand, I will attach some small rope from the bottom of each window and feed it through the outside to a small hole that I will drill out. Then when I want to lift each window, I will just pull on the rope and quietly lift each one.

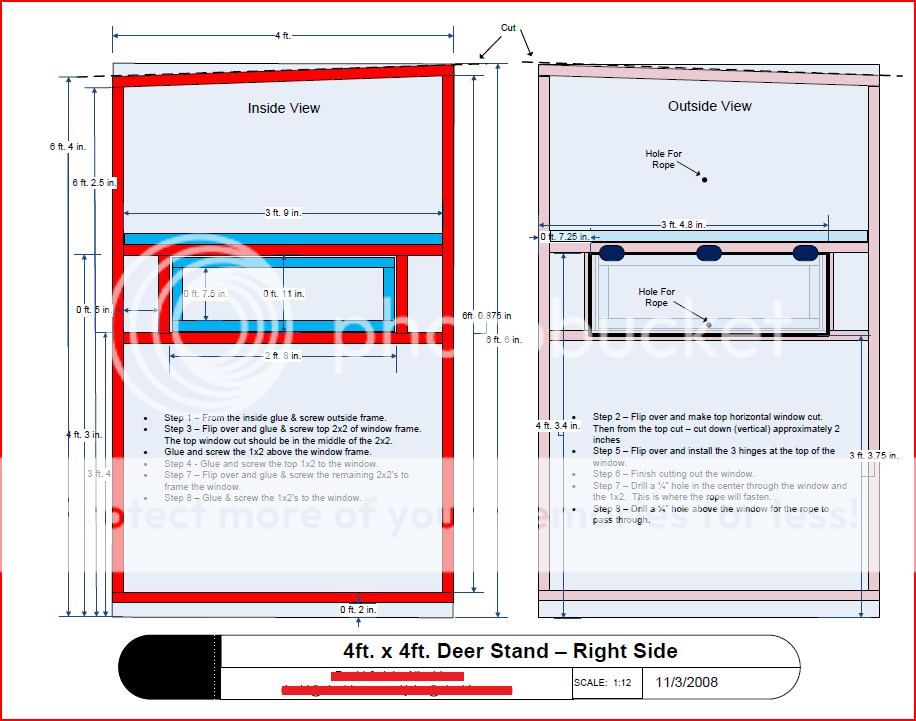
Here is another view of the front left panel. The remaining sides are almost identical to this except some have 2x2’s offset 1.5 inches or the 2x2’s are framed flush with the edge. You can also see here the bottom 2.5 inches that is below the lower 2x2. This will help with setting up the stand when I put it together in the woods. It allows me to place each panel flush with the base.

Here are two pictures of the framed out window


A little secret my dad showed me was when I cut out each window and door was to just cut out the top horizontal line (where the hinges go) and then the 2-3 inches on each vertical cut for the window. Once you have that part cut, you can just frame out the top part and install the hinges. By only cutting out a portion of the window and then installing the hinges, you don’t have to worry about having the whole window cut out and then mess with trying to line everything up properly to install your hinges.
Here is how my cut looked before I installed my hinges

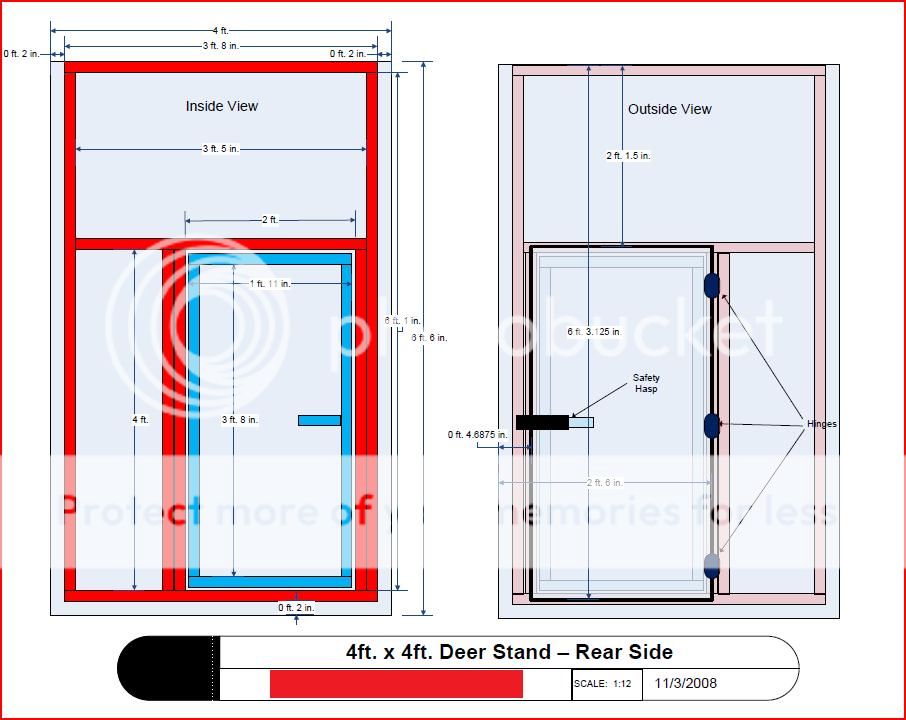
Here are a few pictures of the panel with the door. I’m 6’3” so I made it tall enough so I didn’t have to worry about always hitting my head! I also went the extra mile and installed 4 hinges so it wouldn’t warp or slope down after a few years.


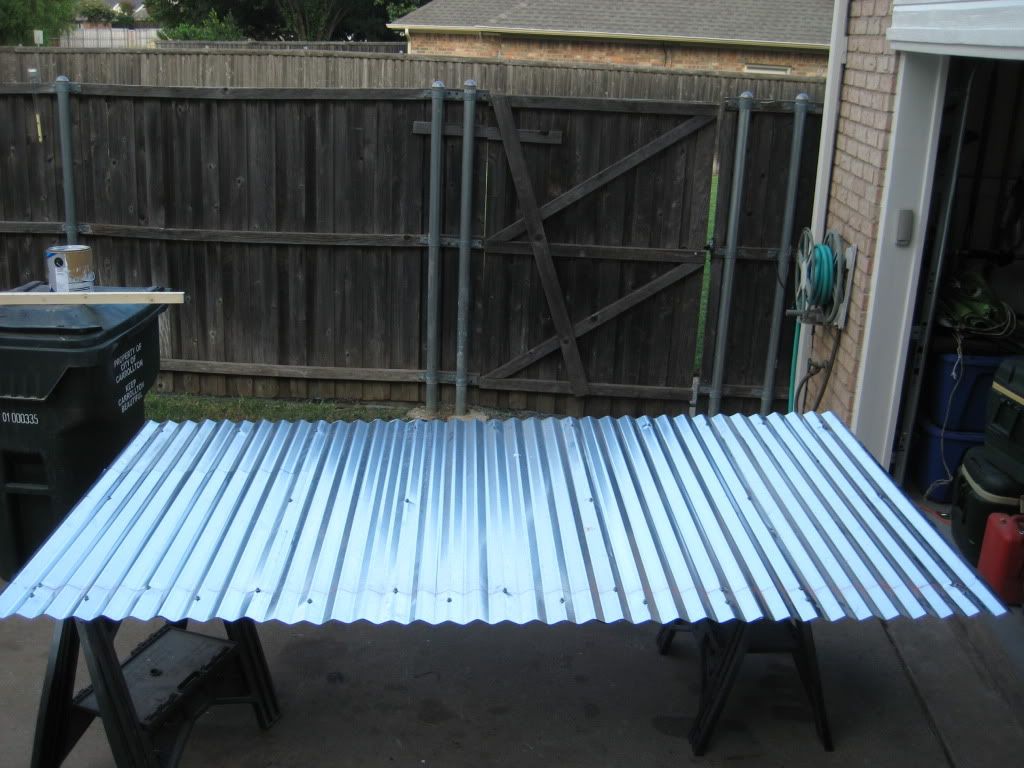
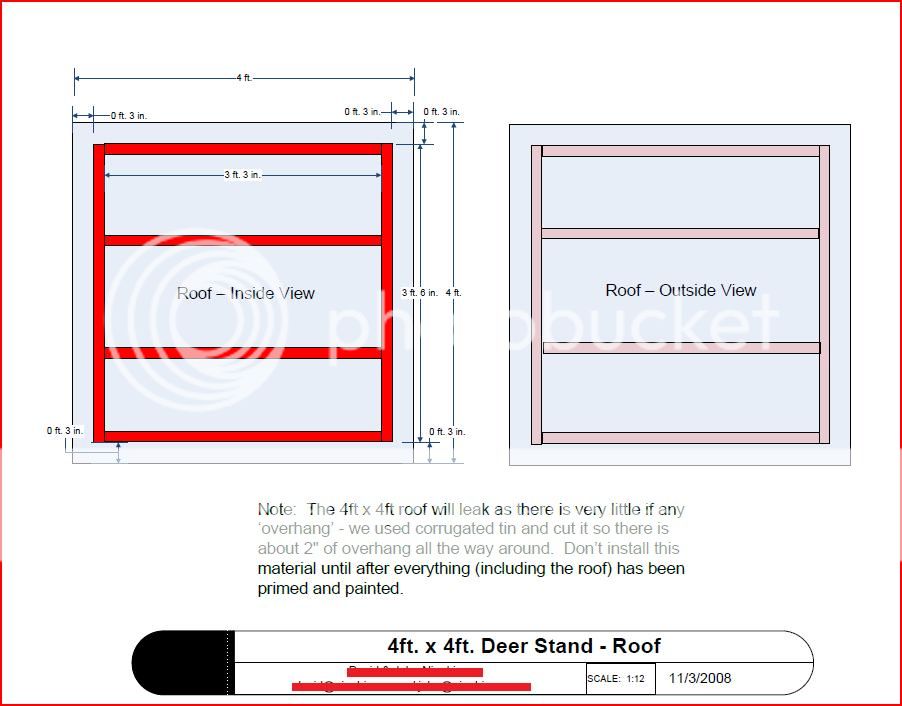
On the roof, I framed it out just like the other panels. On each side I offset the 2x2’s about 1.75” (1.5” for the adjoining panels 2x2 and .25” for the plywood on the same adjoining panel. The stand has a 3” drop from the back towards the front. That way, if it rains on me, I won’t have to worry about exiting or entering the stand with rain draining on me as I climb on the ladder! I also added a tin roof to make it last a lot longer. The white paint you see is the primer. I forgot to take pictures before it got painted

I painted the entire inside black and the exterior is a brownish color. I figured that since there isn’t too much “green'ery” in the winter time during deer season, brown would be a better option. Also, where I hunt doesn’t have any cedar trees or live oaks, so I didn’t want to place a big green stand in an area that doesn’t have big trees. (Yeah, I know deer are colored blind and color doesn’t really matter)
Here are all the panels with 2 coats of brown on them:

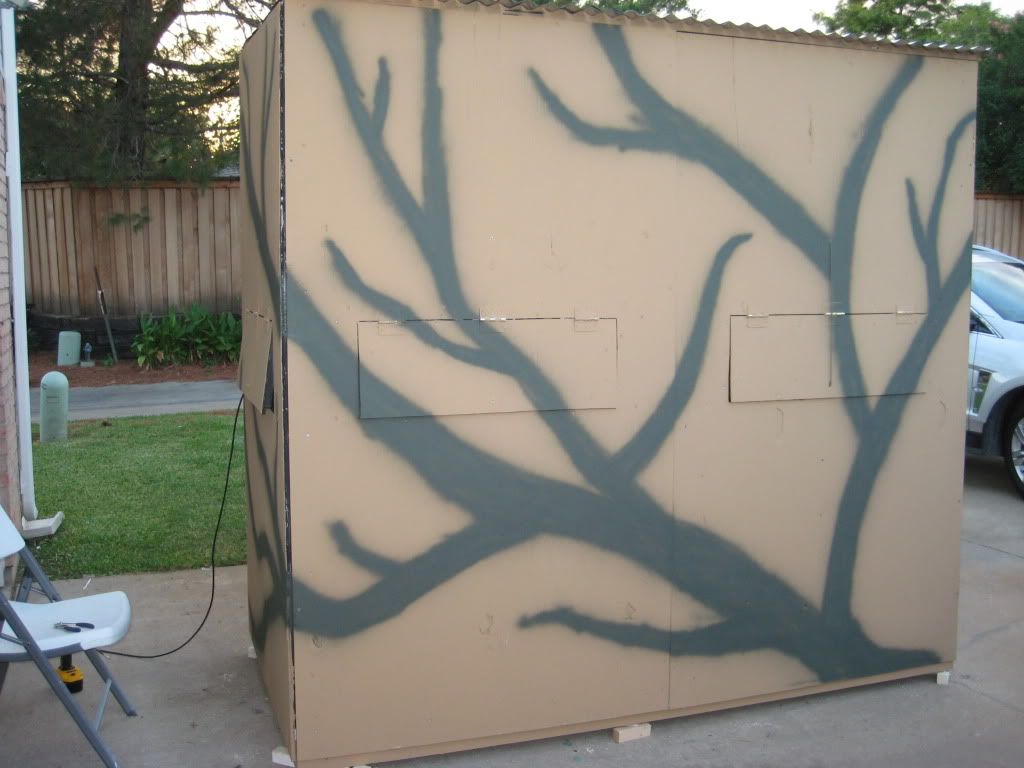
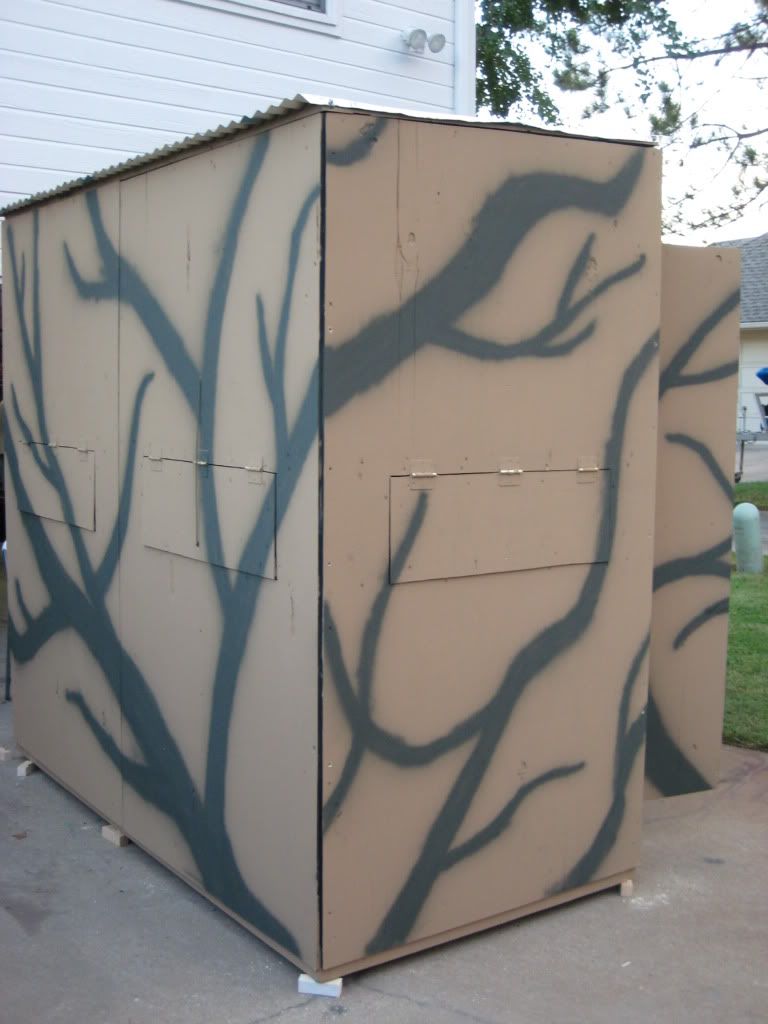
I decided to try spray painting some branches on my stand. I wanted to camouflage it somehow, but didn’t want to make it too complicated. I went ahead and lined all the panels together and made one big branch across all the panels and then I spray painted little random branch in different places. I’m pretty happy with it so far

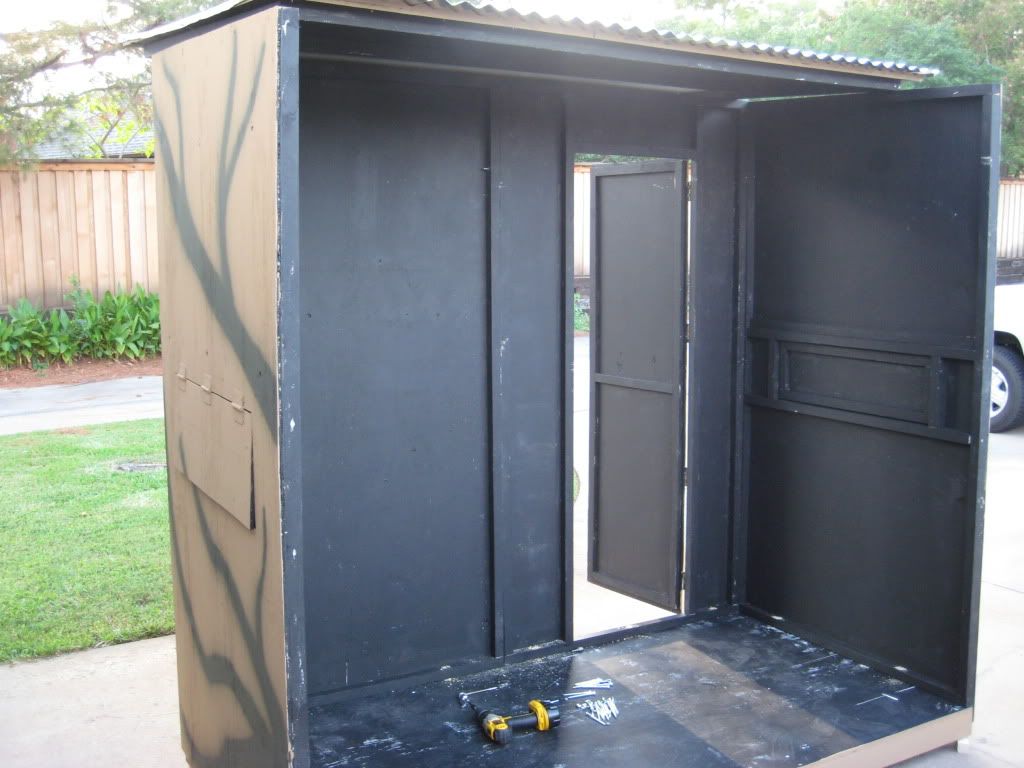
The last few pictures are the final product. The first picture shows my stand being assembled. I have the back 2 panels bolted together, then the left, right and roof in place. All that it needs are the two front panels. I didn't care to much about the lower half of the interior since I'm going to line it with some old carpet to keep it quiet.
Completed Deer Stand:
Here are some video that I made while I built this stand:
Front Left Panel (sorry for all the “therefores”)
http://www.youtube.com/watch?v=WcfXL_8vGh4
Left Panel
http://www.youtube.com/watch?v=avKVBMiQslc
Back Right Panel (Door)
http://www.youtube.com/watch?v=u5A7S0Bd6Cw
How I cut out the windows
http://www.youtube.com/watch?v=IIZQjT-Nd5o
[This message has been edited by AGGIE WH08P (edited 9/26/2010 8:36p).]
The stand is made up of 8 different sheets of plywood. Two panels for the front and back side on the 8 foot sides, one single piece on the left and right ends measuring four feet wide, and then one sheet for the roof and another one for the floor.
I framed the perimeters of each sheet of plywood with 2x2’s and the area around each window cutout is also framed with 2x2’s. The window flap is framed out with 1x2’s to keep it from warping in the future. The base of my stand is framed out with 2x4’s and 3/4” plywood. I also made sure that I put wood glue on every single piece of wood that is screwed to the plywood making it last longer and keeping it from squeaking.
I went ahead and attached pictures and a few youtube links to some short videos. I have sent a few of y’all my plans in the past and I really wanted to document this project for future deer stands that I build and to also share with my buddies.
Here is my first completed panel. I believe this is the front left side

Here is a close up of the window. Framed with 2x2’s and 1x2’s. The 2x2’s are centered on the window cutouts so the window is able to shut flush and tightly. Once I put up my stand, I will attach some small rope from the bottom of each window and feed it through the outside to a small hole that I will drill out. Then when I want to lift each window, I will just pull on the rope and quietly lift each one.

Here is another view of the front left panel. The remaining sides are almost identical to this except some have 2x2’s offset 1.5 inches or the 2x2’s are framed flush with the edge. You can also see here the bottom 2.5 inches that is below the lower 2x2. This will help with setting up the stand when I put it together in the woods. It allows me to place each panel flush with the base.

Here are two pictures of the framed out window


A little secret my dad showed me was when I cut out each window and door was to just cut out the top horizontal line (where the hinges go) and then the 2-3 inches on each vertical cut for the window. Once you have that part cut, you can just frame out the top part and install the hinges. By only cutting out a portion of the window and then installing the hinges, you don’t have to worry about having the whole window cut out and then mess with trying to line everything up properly to install your hinges.
Here is how my cut looked before I installed my hinges

Here are a few pictures of the panel with the door. I’m 6’3” so I made it tall enough so I didn’t have to worry about always hitting my head! I also went the extra mile and installed 4 hinges so it wouldn’t warp or slope down after a few years.


On the roof, I framed it out just like the other panels. On each side I offset the 2x2’s about 1.75” (1.5” for the adjoining panels 2x2 and .25” for the plywood on the same adjoining panel. The stand has a 3” drop from the back towards the front. That way, if it rains on me, I won’t have to worry about exiting or entering the stand with rain draining on me as I climb on the ladder! I also added a tin roof to make it last a lot longer. The white paint you see is the primer. I forgot to take pictures before it got painted


I painted the entire inside black and the exterior is a brownish color. I figured that since there isn’t too much “green'ery” in the winter time during deer season, brown would be a better option. Also, where I hunt doesn’t have any cedar trees or live oaks, so I didn’t want to place a big green stand in an area that doesn’t have big trees. (Yeah, I know deer are colored blind and color doesn’t really matter)
Here are all the panels with 2 coats of brown on them:

I decided to try spray painting some branches on my stand. I wanted to camouflage it somehow, but didn’t want to make it too complicated. I went ahead and lined all the panels together and made one big branch across all the panels and then I spray painted little random branch in different places. I’m pretty happy with it so far

The last few pictures are the final product. The first picture shows my stand being assembled. I have the back 2 panels bolted together, then the left, right and roof in place. All that it needs are the two front panels. I didn't care to much about the lower half of the interior since I'm going to line it with some old carpet to keep it quiet.

Completed Deer Stand:


Here are some video that I made while I built this stand:
Front Left Panel (sorry for all the “therefores”)
http://www.youtube.com/watch?v=WcfXL_8vGh4
Left Panel
http://www.youtube.com/watch?v=avKVBMiQslc
Back Right Panel (Door)
http://www.youtube.com/watch?v=u5A7S0Bd6Cw
How I cut out the windows
http://www.youtube.com/watch?v=IIZQjT-Nd5o
[This message has been edited by AGGIE WH08P (edited 9/26/2010 8:36p).]


 [/url]
 [/url]
 [/url]
 [/url]
 [/url]
 [/url]
 [/url]